Preview
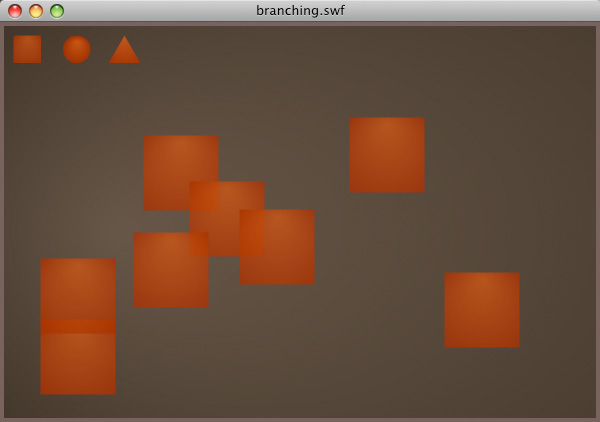
After our gentle yet thorough introduction to the concept, we'll apply the ideas in a little shape drawing application, which can be seen below. Click on one of the little shape buttons, then click elsewhere on the stage to place that shape:
Step 1: What is Branching?
Branching is a generic term given to constructs in our code that allows us to make choices and do one thing, or another, depending upon a given condition. This is something called "flow control" because it can do different things depending on the conditions. There are numerous other terms for this aspect of programming, including conditions or conditional statements, logic, or even the colloquial if statement. The key thing to realize is that branching is basically the brains of the operation, the logic that gives your program some intelligence. Without branching, you won't be able to accomplish very much as a programmer.
Think of branching as those old Choose Your Own Adventure stories. If you don't remember these, they were "game books" where you started reading on page 1, but were soon presented with choice: If you decide to do X, turn to page 10. If you decide to do Y, turn to page 15. Reading the book straight through wouldn't make sense. You had to make your choices and jump around the book like a literary leapfrog. In any given reading of the book, you would only read a fraction of the pages. Every time you reached the end of a section, you'd branch off onto either one path or another. See Wikipedia's page on the Choose Your Own Adventure books for more information.
Branching in programming is very similar. You set up a condition and then either execute a bit of code or not, depending on whether that condition is met.
For example, imagine a form where you're collecting data from the user. Naturally, you're a good web citizen and want to provide some form validation to catch potential errors before submission. When the user clicks the "submit" button, you check to see if the form passes validation. If it does, you go ahead and submit the data. If it doesn't, then you display some error message.
At the point of clicking the submit button, one of two possibilities could occur, depending on conditions at that point in time. It's not unlike Schrodinger's Cat, if you're familiar with that. We could branch off in one direction, following the path where the data gets submitted, or we could branch off in another direction, where errors get displayed. It's entirely possibly to end up back at that branch point and take a different path (for example, you tried to submit invalid form data, got the errors, fixed them, then clicked the submit button again, this time successfully).
The curious may wish to do a little light reading on causality at Wikipedia.
Step 2: Your First Branch
OK, it's technically not the first, if you've been following along with the AS3 101 series. We've thrown them in before, but that's largely because it's next to impossibly to write a meaningful program (even simplified programs used to teach programming concepts) without some kind of logic in it.
We're going to write pretty much the simplest branch we can. We'll use an if statement.
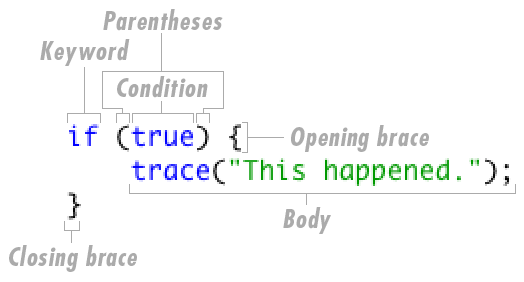
- if (true) {
- trace("This happened.");
- }
Let's break it down. First, we have the if keyword. This is a reserved word in the ActionScript language that marks the start of an if block. Immediately following this is the condition. The condition goes in between parentheses. Leaving out the parentheses will cause an error; I bring that up because I still sometimes forget to put them in! We'll talk about conditions more in the next step, but for now we'll simply use true as our condition. After the condition is an opening curly brace. This marks the beginning of a block of ActionScript statements that will execute if (and only if) the condition is true. After the block of statement(s) is a closing brace, marking the end of the block.
You might like to read the above code in a more English-friendly way, like "if the condition is true, then execute the statements between the curly braces." Or, to be more specific in our example, "if true is true, then trace 'this happened.'" As a hypothetical example, one might read "if the user is logged in, then display the 'View my account' button."
So, if the condition ends up being true, then everything between the curly braces gets executed. On the other hand, if the condition ends up being false, then the entire block of code between the braces is skipped. Go ahead and run this movie. Since the word true is a true condition, then you'll see the trace in your Output panel. Close the movie and modify the code so that it looks like this:
- if (false) {
- trace("This happened.");
- }
Run it again; because false is not a true condition, you won't see anything happen. The block was skipped.
If you want to experiment here, go ahead. If you feel a little shaky on this information, now's a good time to answer those "what if I did this?" questions you might have. You might try putting more statements inside the if block, or putting statements around the block, to see what happens under which circumstance.
Step 3: Boolean Expressions
Remember that condition we used in step 2? It isn't much of a condition. As it stands, the whole if structure is just a formality, because we're using the Boolean literal true, which means the block always runs. Naturally, that first example is an over-simplified version. To make use of conditions, we need to become familiar with Boolean expressions.
You probably know that the Boolean datatype is something native to AcionScript. A variable that is a Boolean can either be true or false. It's worth noting that while we use the words true and false, these are actually keywords in the language. They are not Strings "true" and "false."
So, a Boolean is something that can have one of two values: true or false. Sometimes you might think of these as yes or no, or 0 or 1 (which gets down to the whole binary aspect of it...but that's not important right now). A Boolean expression, then, is an entire expression that evaluates to one of two values, true or false. Wikipedia has a short article on this subject, which can be augmented by the more in depth discussion on expressions in general.
To make the most of Boolean expressions, we need to learn a few Boolean operators...little symbols that work with values and evaluate them into Boolean values. All but one of them work on two values; the value on the right and the value on the left, comparing the two. Here's a short table of the operators you'll most often use:
| Operator | Name | Is true if | Example |
| == | Equality | left side equals right side in value | 42 == 42 |
This is probably the most used one. It compares the two values on either side and returns true if the two values are the same and false if they are not. This is called the equality operator and is different from the assignment operator that you met in the AS3 101 tutorial on variables. Mixing up those two operators is very easy to do and even after years of programming I still occasionally goof up on that one. Consider yourself warned (we'll talk about this again shortly).
As an example, 5 == 3 would be false. "Hello" == "Hello" would be true.
| Operator | Name | Is true if | Example |
| != | Inequality | left side does not equal right side in value | 42 != 5 |
The above is the inequality operator and would probably take second for most used comparison operator. It does the exact opposite of the equality operator. If the two operands are the same value, it evaluates to false. If they are different, you get true.
For example, 5 != 3 would be true. "Hello" != "Hello" would be false.
| Operator | Name | Is true if | Example(s) |
| < | Less than | left side is numerically less than right side | 5 <> |
| <= | Less than or equal to | left side is numerically less than, or equal to, right side | 5 <= 42 42 <= 42 |
| > | Greater than | left side is numerically greater than right side | 42 > 5 |
| > | Greater than or equal to | left side is numerically greater than, or equal to, right side | 42 > 5
42 >= 42 |
The above compares the numerical values and work very much like what you probably already know from basic arithmetic. For example, the expression 5 > 3 is true because, in fact, 5 is greater than 3.
| Operator | Name | Is true if | Example |
| && | Logical AND | left side is true and right side is true | 42 == 42 && 5 == 5 |
| || | Logical OR | At least one side is true | 5 == 5 || 42 == 5 |
If you've ever done Boolean math, then these will probably be familiar. They both look at the Boolean values on either side and return a Boolean value depending on the combination of values.
AND will only return true if both operands are true. If one of them is false, then the whole expression is false. It's like saying, "If the ice cream store is open AND they have cheesecake ice cream today, then I'll buy some." Both of those conditions must be true for the result to be positive. The store may be open, but they don't have cheesecake, so we won't buy any. Or maybe they had cheesecake in stock today, but they closed early, so obviously we can't buy anything. Both must be true for the final result to be true.
OR will return true if at least one of the operands is true. It will only return false if both are false. We can imagine a scenario where we might say, "If either the local pizza joint OR the corporate pizza chain are open, then I'll get some pizza for dinner." In this case, we're not as discriminating as with the ice cream place. We're up for any kind of pizza, really and as long as one of them is open, we're set. If both are closed, then we're out of luck. Of course, both might be open, but in that case we still end up with pizza.
Which brings up the concept of short-circuiting a Boolean expression. Notice that with both AND and OR, there are 4 possible combinations of values. Three of those values will the the same, one will be the other value.
| AND | true | false |
| true | true | false |
| false | false | false |
| OR | true | false |
| true | true | true |
| false | true | false |
The upshot of this is that sometimes ActionScript doesn't actually evaluate the entire expression. For example, take our pizza place analogy. Imagine we call the local pizza joint and find out they're closed, so we call the corporate pizza chain and luckily they're open, so we go get pizza. If, however, the local joint was open when we called them first, then there's no need to call the corporate chain, because we know that there is at least one place open and it's the one we'd prefer anyway.
Similarly, if we call the ice cream store and they're open, then we need to find out if they have cheesecake and only then will we go get ice cream. However, if the store is closed, then there really isn't much point of checking on the cheesecake, because we couldn't get it anyway.
In these cases, ActionScript evaluates "just enough" of the entire expression to determine the outcome. Why would you want to know this? For optimization reasons. If you have an OR expression and one of the operands is a simple Boolean variable value and the other is a complex statement involving lots of calculations and function calls, then you'd be a bit better off by sticking the simple variable first in the expression. If it's true, then there's no need to execute the complex statement. ActionScript knows this and will therefore entirely skip the execution of that statement. In a performance critical application, that's the kind of optimization you can do easily.
| Operator | Name | Is true if | Example |
| ! | Logical NOT | reverses the right side | !(42 == 5) |
The exclamation point simply reverses the state of the Boolean expression to its right. For example:
- var thisIsTrue:Boolean = true;
- trace(!thisIsTrue);
Will result in false being sent to the Output panel.
Like so many things in programming, Boolean logic is actually rooted in mathematics. You may remember Venn diagrams, truth tables and logic gates from some math class long ago. This is the mathematical Boolean logic. Wikipedia once again provides further reading if you wish to take a tangent.
Step 4: Using a Boolean Expression in the Condition
Let's put all that theory we just learned to use. Let's change that if (true) to something a little more realistic:
- var state:String = "foo";
- if (state == "foo") {
- trace("The current state is 'foo'");
- }
OK, so it's not completely realistic, but now we have an comparison for equality happening in the condition. Run this and you should see the trace. Try changing either the value of the state variable or the String used in the comparison. For example:
- var state:String = "bar";
- if (state == "foo") {
- trace("The current state is 'foo'");
- }
So, what's happening? Well, pretty much the same thing as before, except we have a more interesting condition. We start by setting the value of a state variable (presumably to keep track of the current state of our application). Then we hit the if block and evaluate the expression inside the parentheses. If the whole expression evaluates to true, then we execute the stuff between the braces. The only real difference is that our expression is more complex.
But it's not bad; it's just the equality operator, used to compare the value of state against the literal String "foo". In the first example, that's exactly what state is, so the condition is true and we see the trace. In the second example, state is not "foo," so we don't see the trace.
Let's try a slightly more complex example:
- var state:String = "bar";
- var loggedIn:Boolean = true;
- if (state == "foo" && loggedIn) {
- trace("Welcome, logged in user! The current state is 'foo'");
- }
Again, we have our state variable. We also have another variable loggedIn, hypothetically tracking whether or not we've logged in. Our condition is actually checking for two things: first, whether the current state is "foo," and also if we're logged in. If we come short on either of those, then the whole thing is false (the AND operator requires both to be true) and nothing else happens.
You may be wondering how we knew to compare state to "foo" first and not check to see if "foo" AND loggedIn is true. There's something called operator precedence, which works a lot like the same thing in mathematics (they way I keep bringing that up, you'd think I'd have stock in mathematics to sell you). For example, in the mathematical expression 2 + 3 * 4, you multiply 3 by 4 first, then add 2, because multiplication takes precedence (happens first) over addition. All of those logical operators we discussed last step have precedence as well. I won't get into a formal discussion on it, but you can find information about ActionScript's operator precedence here and here and a rather geeky article on precedence in general on Wikipedia here.
But for now, we can get a lot of mileage knowing that the && and || have a lower precedence that all other operators listed in the previous step. So, we know that the equality comparison will evaluate first and the result of that evaluation will be used in the AND expression. If this is still confusing, let me put it this way: The following:
- if (state == "foo" && score > 100) {...
Will evaluate to exactly the same thing as:
- if (score > 100 && state == "foo") {...
Aside from the previously mentioned short circuiting that might happen, these statements are exactly the same.
It's useful to think of AND and OR as separators of sorts for multiple conditions that all need to be evaluated. They kind of work as commas in a list to separate elements.
Step 5: Getting Booleans Out of Non-Boolean Values
Something else to understand is how pretty much any value, whether or not it's a Boolean value, can be used in places where a Boolean is expected, such as in the condition of an if statement (but not assigned to variables datatyped as Boolean; that's not what I mean). For example, consider this:
- if (42) {
- trace("It was true.");
- }
Run that snippet and you'll see the trace. But 42 isn't a Boolean! How'd that happen? Well, when we add a numeric value to the condition, it's evaluated like this: if the number is 0, then treat the condition as false. Other wise, treat it as true. You can see the effects of this by swapping out 42 with 0.
Strings follow similar rules. Any String except for an empty String will be true; an empty String will be false.
- if ("a") {
- trace("'a' is true");
- }
- if ("") {
- trace("You'll never get here.");
- }
Similarly, any complex object, such as Arrays, Sprites and MovieClips, XML and URLRequests can evaluate to a Boolean value. Try this one out:
- var sprite:Sprite = new Sprite();
- if (sprite) {
- trace("We have a Sprite.");
- }
Run it and again you'll see the trace. However, try the following:
- var sprite:Sprite;
- if (sprite) {
- trace("We have a Sprite.");
- }
and you won't. The only difference here is that we never put a value into sprite. In the first example, sprite had a value and therefore the condition was treated as true. In the second example, we declared the variable but never put a value into it, so the value of the variable was undefined or null. When that gets put into the condition, it evaluates as false.
This can be useful to ensure that some object has been initialized before attempting to use it. For example, the following code would cause a runtime error (go ahead and try it to see what I mean):
- var sprite:Sprite;
- sprite.x = 100;
Whereas the following provides a safety net:
- var sprite:Sprite;
- if (sprite) {
- sprite.x = 100;
- }
One more tidbit then we'll move on. As mentioned earlier, a common mistake is to confuse the assignment operator (a single equals sign) with the equality operator (two equals signs). Our condition that looks like this:
- if (state == "foo") {...
Could easily accidentally be written:
- if (state = "foo") {...
It's a subtle difference and easy to make. But let's look at what happens when the assignment operator is used here. This isn't a Boolean expression per se, but as mentioned earlier in this step, when a Boolean is expected, whatever value is fed to it will be translated to a Boolean. The result of an assignment operation is the value being assigned. That is, the expression state = "foo" actually evaluates to "foo". So, according to what we learned earlier, a non-empty String will evaluate to true, so in this case the condition is met and we run the code. However, we aren't checking to see if state is "foo" – it could be any other value – we're always assigning it to the value "foo" and always running the code. This error does actually cause a non-fatal warning when compiling: "Warning: 1100: Assignment within conditional. Did you mean == instead of =?", but the SWF will still run and simply have faulty logic in it. If it weren't for the compiler warning, you'd probably end up spending several minutes, if not hours, trying to track down the bug.
Step 6: The If/Else
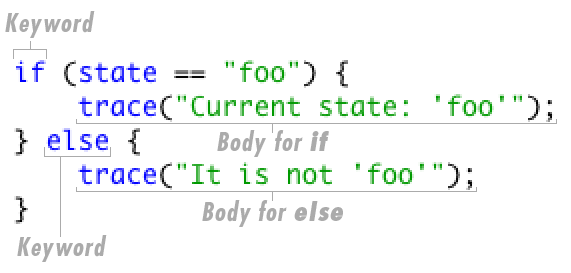
OK, let's move on! There's so much more to cover. The if statement by itself is extremely useful, but sometimes we'll want to not only execute some code if something is true, but also execute a different bit of code if that same something is not true. For example, back in step 1 I used the example of submitting a form and either displaying errors or sending the data, depending on whether the condition of the input being valid or not. In this case, we'd want to turn to the if/else statement. It looks like this:
- if (state == "foo") {
- trace("Current state: 'foo'");
- } else {
- trace("It is not 'foo'");
- }
Here, we introduce a new keyword, else, along with another set of curly braces. This will probably be somewhat intuitive at this point, but the gist is that if the condition is true, then we execute the first block (between the first set of braces), but if that condition is false, then we execute the second block. It's either/or, we will never run both blocks in any given execution of the entire block.
Step 7: The If/Else If
Sometimes there are more than two possibilities. For this, we turn to the else if. These go after the initial if, but before the closing else (if present). For example:
- if (state == "foo") {
- } else if (state == "bar") {
- } else {
- }
- if (state == "foo") {
- } else if (state == "bar") {
- } else if (state == "fud") {
- } else if (state == "splat") {
- } else {
- }
And keep in mind that the else is still optional. We might have several states, but only want to do some stuff if we're in one of two states. Otherwise, nothing needs to happen. So we can easily do this:
- if (state == "foo") {
- } else if (state == "bar") {
- }

One more detail worth noting: if we had a chain of else ifs, the ActionScript considers it a job well done as soon as it finds the first true condition. So if the second else if succeeds, then it doesn't matter if the fourth else if would also succeed under the current condition; once the second else if block's code executes, the entire block is done. For example:
- var state:String = "bar";
- if (state == "foo") {
- trace("Foo state.");
- } else if (state == "bar") {
- trace("You'll see this one for sure.");
- } else if (state == "bar") {
- trace("Pigs are flying.");
- }
Step 8: A Note on Braces
I cuddle my braces, if only because I like the way that sounds. That's a silly word meaning that I place my opening brace at the end of the same line as the thing needing the brace. You'll see two main variations, though:
- if (state == "foo")
- {
- trace
- }
- else
- {
- trace
- }
Which seems to be the Adobe-approved method, sometimes called ANSI style. If you're a cuddler, though, you may still find it easier to read long branch block if you drop the else if or else word down on the next line, like so:
- if (state == "foo") {
- trace
- }
- else {
- trace
- }
No one way is right, but people are usually be very passionate about their choice. All sides claim that their way is the easiest to read. But the important thing to know is that ActionScript ignores whitespace around the braces. You could do this:
- if (state == "foo") {trace("foo")}else{trace("bar");}
or this
- if (state == "foo")
- {
- trace("foo")
- }
- else {
- trace("bar");
- }
There are actually quite a few variations of styles and they all have names and rationales. Head over to Wikipedia for a thorough discussion on them.
And this discussion does lead into the no-brace variation, which I advocate in certain cases.
- if (state == "foo") trace("You're on foo");
If the whole block to be executed in response to a true condition is a single line, then you can omit the curly braces. While the previous snippet makes the most sense to me (it practically reads like an English sentence: "If state is equal to foo, trace you're on foo"), the whitespace involved is again inconsequential. You'll sometimes see this:
- if (state == "foo")
- trace("You're on foo.");
While perfectly valid and can make for nice compact branches, like
- if (state == "foo")
- trace("You're on foo.");
- else if (state == "bar")
- trace("You're on bar.");
- else if (state == "fud")
- trace("You're on fud.");
- else
- trace("What are you on?");
The problem comes when you invariably need to add a second line. ActionScript isn't smart enough to just consider the code between the if and the else if to be the block...it's either the code between the braces, or the first statement after the if, if there are no braces. At some point well after originally writing the above code, you will probably have to change it to:
- if (state == "foo") {
- trace("You're on foo.");
- trace("Which is a lovely place to be.");
- } ... etc.
which means adding braces. You will either not enjoy retrofitting your code with braces, or you will forget, producing some spectacular errors and then be forced to go and not enjoy retrofitting your code with braces, anyway.
One last note on this, then we'll move on: keep in mind that the no-brace rule is for the first statement after the if (or else), not the first line. If you tried to cram two statements into one line, like so:
- if (state == "foo") trace("You're on foo.");trace("Which is a lovely place to be.");
The second trace is considered a whole separate statement and will not be counted as part of the if clause. That snippet by itself will always trace "Which is a lovely place to be," regardless of the value of state.
Step 9: Switch Blocks
Kinda sounds like a 19th century rural society discipline implement. But they're actually an alternate way to write the if blocks involving what value a certain variable may hold. It looks like this:
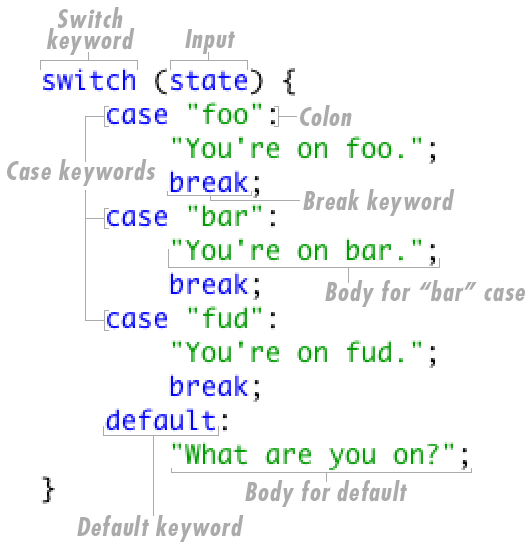
- switch (state) {
- case "foo":
- trace("You're on foo.");
- break;
- case "bar":
- trace("You're on bar.");
- break;
- case "fud":
- trace("You're on fud.");
- break;
- default:
- trace("What are you on?");
- }
You will probably get the idea without the intricate breakdown coming up next and you'll probably see this as a much easier-to-read version of the same thing.
So, let's break it down. First, is the switch keyword. Much like the if keyword (or var or function), it kicks off the whole thing.
Then, also like the if block, there's a set of parentheses. However, instead of evaluating the contents of the parentheses into true or false, a switch simply evaluates the parentheses to its value. In this case, the state variable holds a String and so the switch will "remember" this value as it executes.
Then some curly braces. So far, nothing too worrisome.
Then we get to the case keyword. This is a special entity in ActionScript that is of use only within a switch block, kind of like how you can only use the else keyword if it's following an if block. Immediately after the case word we have a value (a literal String in this case) and the whole case is terminated by a colon. What happens here is that the value of the case ("foo" for the first one) is compared to the value in the switch (whatever state currently holds). If there is a match, then the code underneath the case statement executes. If not, then it skips that code and moves on to the next case.
The default will run if there was no match in any of the cases; it's sort of like an else block.
Step 10: Take a Break
Those break statements in the switch block are really important. Without them, code executing as a result of a matching case will continue to execute. For example, the following code is a variation on the last example, except without break statements. Setting the state variable to "foo" will give you unexpected results:
- var state:String = "foo";
- switch (state) {
- case "foo":
- trace("You're on foo.");
- case "bar":
- trace("You're on bar.");
- case "fud":
- trace("You're on fud.");
- default:
- trace("What are you on?");
- }
If you run that, you'll see you got all four traces. Why? Because without breaks in there, the code starts executing after the first match. It doesn't matter that the second case doesn't match; the switch statement basically says, "OK, I found match. I'll start executing all code that is not a case or default line, until I see a break.
You may be thinking that that's awfully inconvenient and in truth it can be. 9 times out of 10, you'll write switch statements with a break for every case. It equates to a series of if/else-if/else conditions.
However, this behavior can actually be quite useful once you grasp the flexibility it can lead to. Imagine you wanted to tell if a number was part of the Fibonacci sequence. There are certainly better ways to do this, but the following example illustrates a use of a case without a break:
- var value:Number = 5;
- switch (value) {
- case 1:
- case 2:
- case 3:
- case 5:
- case 8:
- case 13:
- case 21:
- case 34:
- trace("Part of the sequence.");
- break;
- default:
- trace("Just a regular number.");
- }
Yes, I know that this is limited to a few hard-coded values and that we could write a function that calculates the sequence in just a few lines, but this is just a simple example of when cases without breaks might be useful. The point here is that the equivalent if statement would look something like this:
- if (value == 1 || value == 2 || value == 3 || value == 5 || value == 8 || value = 13 || value == 21 || value == 34) {
- trace("Part of the sequence.");
- } else {
- trace("Just a regular number.");
- }
You can see that the switch version is easier to read and even easier to change.
- switch (state) {
- case "member":
- show
- case "logged in":
- showLogOutButton();
- case "logged out":
- showLogInButton();
- }
Step 11: Comparing Ifs and Switches
Which is better, an if statement or a switch statement? Well, really, in the end, it comes down to what you prefer. Sometimes, however, there are scenarios when one might be more convenient than the other.
Switch statements shine when all you're doing is checking what the current value of some variable is, especially if it's a situation where you do one thing for one value, another thing for another value and a third thing for a third value, etc.
If statements provide more flexibility. You can test for the value of one variable in the first if, then for the value of a completely different variable in the else if. Also, it's easier to string together a more complex condition, such as
- if (value > 10 && value <>
| key | value |
| "foo" | "You're on foo." |
| "bar" | "You're on bar." |
| "fud" | "You're on fud." |
You always use the key to get or set the value. As long as you have access to the key, the value is just a quick lookup away. By making the possible keys match the possible values of the state variable, it's easy to simply use that variable as the key, which evaluates to a key, which, when used in the table, gets the value out of the table.
It's a bit of an advanced technique, so don't feel bad if it's not quite sinking in. In my opinion, this technique is the best way to make these kinds of one-to-one decisions (that is, for every possible value of some variable, there is one matching outcome, much like how a switch statement is most often used). It does tend to require more memory (though at a scale such as this, that's pretty negligible) and is often limited to exactly this kind of decision-making. But once you get the hang of it, you'll probably find yourself appreciating the elegance of the solution. If you're liking what you hear, but need further information, visit the lookup table page on Wikipedia.
Step 13: Use Branching to Control a Tool Bar
Let's build something worthy of all of this knowledge. As you saw at the beginning of this tutorial, we're going to build a (very) simple drawing application. It's so simple, in fact, that calling it a drawing application is quite a bit misleading. We're only going to "draw" three predefined shapes by selecting the shape we want from the tool bar and clicking to place that shape on the canvas.
Start by opening up Flash and creating a new ActionScript 3.0 Flash document.
If you're too anxious to sit through the non-code portions of this tutorial, you can download a starter Flash document that has all of the artwork as described in the next three steps ready to go. If you do so, I still recommend that you at least read through the next three steps, as the information on making linkable symbols my prove valuable later.
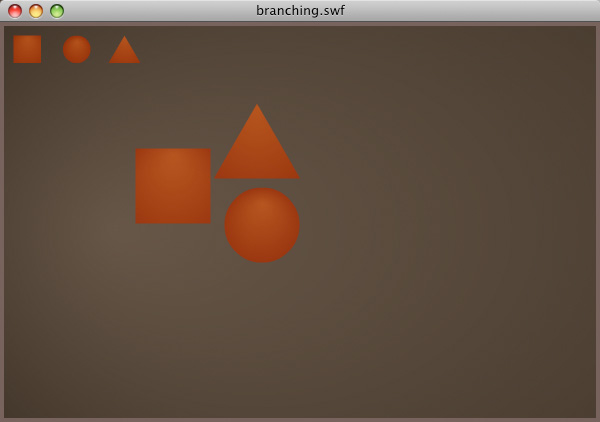
Step 14: Draw Three Objects
We're going to draw the three shapes that will be "drawn" when the movie runs. Feel free to draw whatever you like, but I encourage you to stick with what I'm doing, as then the names and code will match up later and it'll be easier to spot any mistakes you might make while typing.
I've drawn a square, a circle and a triangle using the standard Flash drawing tools. I rule. Keep them about the same size. Feel free to change up the color.

Step 15: Make Linkable MovieClips
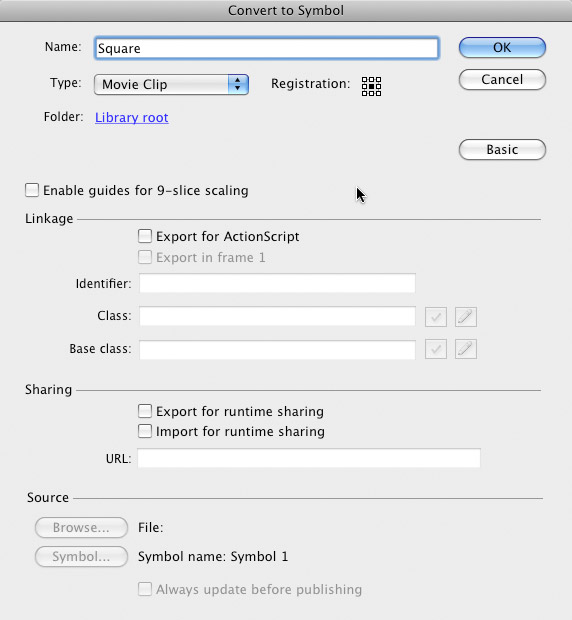
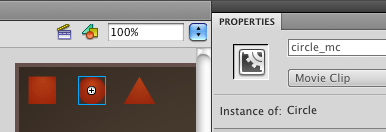
For each shape, click on it, then press F8 to bring up the "Convert to Symbol" dialog. Give each a name; for ease of following along, you might want to match my names. I used "Square," "Circle," and "Triangle." I trust you can determine which name goes with which symbol.
Make sure you have the registration point set to center
If your window looks like this:
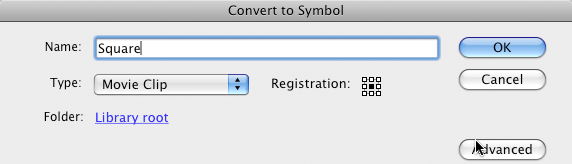
Press the "Advanced" button. Flash will remember your choice, so if you've already pressed this button and haven't reverted back to "Basic," then your window will look like this:
Now, click export for ActionScript and make sure that where it says "Class:" the text input box reads "Square," "Circle," or "Triangle." Again, I trust you can figure out which one should say which.
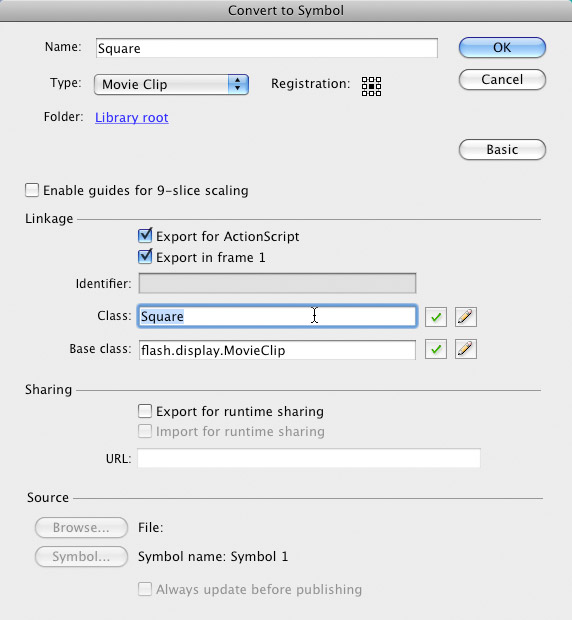
Click "OK."
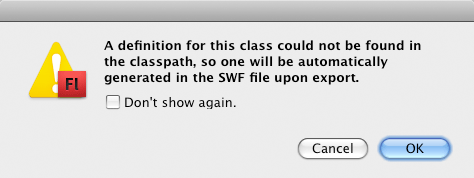
A popup window will warn you that "A definition for this class could not be found in the classpath, so one will be automatically generated in the SWF file upon export." Just click "OK" here. You may be tempted to check the "Don't show again." option, but I suggest that you let Flash warn you every time. You may not need it now, but you will. It will be better to manually dismiss these warnings when they aren't required, than to be doing something wrong and not get the warning.
Don't worry if you don't quite understand what everything in this step is about. I am planning an AS3 101 tutorial that will cover the display list and related topics, such as this one. We have a few other basics to get through first, though.
Step 16: Make a Tool Bar
For simplicity's sake, we'll just use the three objects we just created as buttons for our toolbar. The user can click on one of them to select it and then click in the canvas area to place a shape of that type, until another button is clicked to change the shape.
We'll scale the buttons down to about 1/3 of their original size and place them in a row along the top.
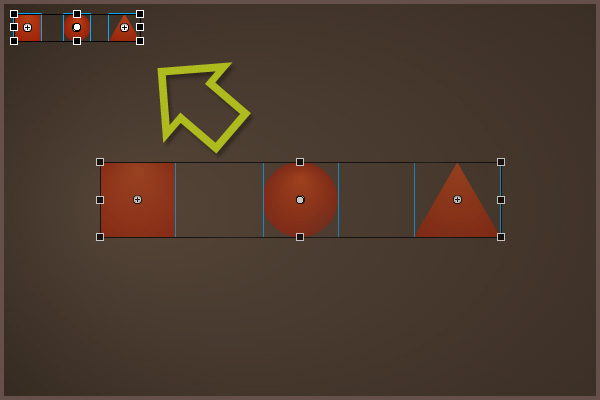
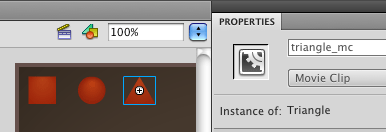
Give each one an instance name. Again, to make following along easier, I recommend you stick to the names I use, but keep in mind that the names really don't matter, just so long as you use the same names where appropriate. Click on each shape button and in the property inspector, type in "square_mc," "circle_mc," and "triangle_mc" as makes sense.

Step 17: Hook Up the Buttons
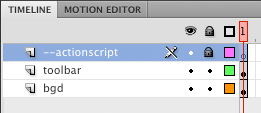
Now we turn to the code. Make a new layer, call it "actions" or "code" or similar, lock it and click in frame 1 of that layer. Press F9 (Windows) / Opt-F9 (Mac) to bring up the Actions panel.
Add the following code:
- square_mc.addEventListener(MouseEvent.CLICK, onToolClick);
- circle_mc.addEventListener(MouseEvent.CLICK, onToolClick);
- triangle_mc.addEventListener(MouseEvent.CLICK, onToolClick);
- function onToolClick(me:MouseEvent):void {
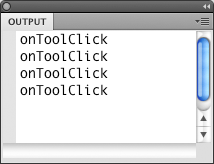
- trace("onToolClick");
- }
You should be able to run the movie and see that you get the trace in the Output panel on each of the three buttons.
If you're new to this and have been following along with the AS3 101 series, you may be wondering how we're going to get different behavior for each of the three buttons by sending all buttons' clicks to the same function. In the last installment, which dealt with functions, we had several buttons and while they did similar things, we had each button's click go to a separate function; five buttons, five functions.
It's actually common to have five buttons go through a single function. In the work that I do, that is actually more common than the alternative. The assumption is that all of the events are similar, such as clicking on a button within a group of buttons. But there are slight variations in the details of the general behavior, depending on which button is clicked. For example, each of our three tools needs to set the application up to draw a shape, which is the general behavior. But each individual button needs to set us up with a specific shape, which is the detail.
How do we determine which details to use? We use branching. Ta-da!
Step 18: Draw a Shape
Before we get to that, though, we need to get some logic in place to actually draw a shape to the screen. Our goal is to put a shape on the canvas when we click, at the location where we click. We'll shy away from the final logic of determining which shape to draw based on the tool buttons and for now just make sure we can click and create a predetermined shape, for example the square.
After the code we've already written, add the following:
- stage.addEventListener(MouseEvent.CLICK, onCanvasClick);
- function onCanvasClick(me:MouseEvent):void {
- var shape:MovieClip = new Square();
- shape.x = me.stageX;
- shape.y = me.stageY;
- addChild(shape);
- }
We're getting into some display list territory for which I'll avoid detailed explanation, for now. Again, I'm planning a display list tutorial which will cover that stuff, so stay tuned if you're confused. Our focus here is the branching logic. But for the insatiable, here is a quick breakdown of the code.
First, we add another CLICK event listener, this time for the stage, so that it should register any time we click anywhere on the movie. This function creates a new instance of our Square symbol and then places it according to the event's mouse location. Every MouseEvent carries with it information about the event in question, including the position of the mouse when the event occurred. To make sure we position our new Square at the mouse position, we can simply grab stageX and stageY from the event object passed into the function. Finally, in order to see the Square, we need to add it to the display list.
If you run this now, you should have a fully functioning movie, except that it always draws squares. We'll fix that next, but right now I want to point out that onCanvasClick describes our general behavior. The only detail in there that keeps us from being more flexible is the part where it says new Square(). We need to be able to create a new Circle and a new Triangle, as well. But everything else – the shape var, the positioning and adding the shape to the stage – will need to be done regardless of the type of shape.
So, for the most part, this code will remain intact, but we need to use branching to determine which kind of shape to actually draw.
Step 19: Fix the Button Click
If you clicked on a button, you would have noticed that not only do you get the button click trace, but you also place a square, because you've managed to click on two things. There are a few ways to get around this, but since we're talking about conditional logic, let's use an if statement.
Inside of onCanvasClick, add a line at the very top of the function:
- if (me.target != stage) return;
This will take the target of the event object (that is, the thing that actually caused the event) and see if it is anything other than the stage. If you click on one of the buttons, the target would be that button, not the stage. Anywhere else you click within the Flash movie should be the stage.
So, if we clicked on something other than the stage, then we'll execute a single line of code: we'll return. This simply stops execution of the function. In other words, if we click on something other than the stage, just stop here and pretend nothing happened.
Note that in this line we are using the inequality operator to do the comparison and we are using the shorthand single-line, no-brace method of writing the if.
Step 20: Fix the Shape Click
You might also have noticed that if you place a square, then click again while your mouse is over that square, you will now no longer place a new square. This is actually introduced by the fix implemented in the last step. When you click on a previously drawn square, the me.target is not the stage, therefore we return and no shape gets drawn.
Let's think about the rules again; basically we only want to stop drawing the shapes when we're clicking on a button. Pretty much anything else is fair game. So, rather than only allowing action when the event target is the stage, we can instead only prevent action when the event target is one of three MovieClips.
We can again use branching to provide the logic. We'll replace that if statement from the last step with a switch statement that will easily do what we're looking for:
- switch (me.target) {
- case square_mc:
- case circle_mc:
- case triangle_mc:
- return;
- }
Here is a great time to omit the break keyword from our switch. Remember, leaving those out will let the case match and continue executing code, even if that code is under another case. Basically, we're saying that if the event target matches any of those three values, then quit now. In any other situation, keep running the function and consequently draw a shape.
Incidentally, normally I'd have skipped the last step, but it seemed like a good way to toss in some extra practice using if statements!
Step 21: Track our Current Tool
This might look familiar if you've been reading this series from the beginning; way back in the first tutorial, on variables, we developed a simple application to keep track of the current button within a group of buttons. We'll take that same idea, but do something slightly different with it. We're also going to skip the idea of disabling the current button and visually treating it; I encourage you to develop that bit of functionality on your own, as an exercise, if you need it. Again, right now our focus is on the branching logic to make this application work at a rather specific level.
We need a variable to store which button was the most recently clicked-on button. This kind of thing is best placed at the top of the script, so jump back to the top and write:
- var currentTool:MovieClip;
With that variable declared, head back to the onToolClick function and replace the trace line with:
- currentTool = me.target as MovieClip;
Now, whenever we click on a tool button, that button clip is tracked within the currentTool variable. Since that variable is declared outside of any function, it persists. We will be accessing the contents of this variable from the onCanvasClick function and place our branching logic there.
We'll have no noticeable changes in our movie at this point, so there's nothing to test. But it's a good idea to run the SWF anyway and make sure that there are no errors and that things still work they way they should.
Step 22: Determine Which Shape - Take 1
We'll actually do this a few times, to illustrate how we can use if statements, switch statements and Dictionaries to achieve the same result. For starters, we'll use the if statement.
We'll be reworking onCanvasClick. In that function make sure it looks like this:
- function onCanvasClick(me:MouseEvent):void {
- if (me.target != stage) return;
- var shape:MovieClip;
- if (currentTool == square_mc) {
- shape = new Square();
- } else if (currentTool == circle_mc) {
- shape = new Circle();
- } else if (currentTool == triangle_mc) {
- shape = new Triangle();
- } else {
- return;
- }
- shape.x = me.stageX;
- shape.y = me.stageY;
- addChild(shape);
- }
The last three lines are the same as before, but the first line just sort of exploded. Let's walk through what happened.
First we simply declare the shape variable, without simultaneously putting a value into it. We'll do that next. So we check to see if the currentTool is the square_mc MovieClip. If it is, then we create a new Square to put into shape. If it isn't, then we check to see if currentTool is circle_mc. If it is, we create a new Circle. But if it's neither the square nor the circle button, we check to make sure it's the triangle button and if so put a new Triangle into the shape variable. If for some reason it's not any of those three possibilities, then we return.
Most of that is probably pretty easy to grasp, but let's look at the else bit again. What's this return business? If you remember your functions, they can potentially return a value. This function is datatyped as "void," though, so it can't return a value. But it can simply return. This make the function stop running, basically. If currentTool isn't a proper value, then we don't want to do anything, so we'll just exit the function here before anything else happens.
So, why didn't we just write "if it's a square, then make a Square, else if it's a circle, then make a Circle, else make a Triangle?" We could have. But there are two reasons why we didn't.
The first reason is simply just to cover the bases. For instance, what happens when the movie first starts? currentTool has no value. If we started clicking on the canvas before clicking on one of the buttons, we'd still get a Triangle. Because currentTool is undefined and that's not square_mc and it's also not circle_mc, so it would fall under the else. So, one reason is just to make sure we start up gracefully. There are other ways of dealing with the initialization, like automatically selecting the square button, but as I said, cover the bases. As the drawing application grows in complexity, you may find that currentTool as somehow ended up with an unexpected value due to a bug in the program. It's better to be prepared for that situation.
The second reason is to better prepare for expansion. There's a good chance we'll want to add more tools, along with corresponding symbols. The way it's written now provides a convenient way to add the necessary branching code to work in our new star tool. In fact, once you're done with this tutorial, I'd recommend that as another exercise: add some more tools.
With all that said, run your movie and you should have a working application. You should be able to switch between the tools and make the appropriate symbol show up on screen. Nicely done!
Step 23: Determine Which Shape - Take 2
That works and works well and we're not going to make it work any better with this next step. But I feel it's important to illustrate how to accomplish this same behavior with a switch statement. Hopefully you'll be able to get a feel for the pros and cons of these different kinds of branching structures.
Remove the if block, from the word "if" in all the way to the closing brace of the "else." In it's place, write the equivalent switch:
- function onCanvasClick(me:MouseEvent):void {
- if (me.target != stage) return;
- var shape:MovieClip;
- switch (currentTool) {
- case square_mc:
- shape = new Square();
- break;
- case circle_mc:
- shape = new Circle();
- break;
- case triangle_mc:
- shape = new Triangle();
- break;
- default:
- return;
- }
- shape.x = me.stageX;
- shape.y = me.stageY;
- addChild(shape);
- }
If you're like me, you'll find that this just looks better. But bear in mind that it is purely a personal preference and if, after trying out switches, you still like if/elses better, then by all means go for it.
But the logic is the same: we're comparing the value of currentTool and creating instances of different symbols depending on that value. We also have our fallback plan. If the value doesn't match anything in our list, we'll simply exit the function and stop trying to draw anything.
Try it out; it should work exactly like it did before.
Step 24: Determine Which Shape - Take 3
Lastly, I'd like to demonstrate the use of the Dictionary to achieve the same effect. Remember that when using these "map" objects, we're actually pre-determining the logic, as opposed to determining the choice with every click. This will require a more substantial rewrite to our application.
First, we need a map Dictionary. Declare it towards the top of the script, with the currentTool variable:
- var toolMap:Dictionary = new Dictionary();
Then we need to start filling in the map. The next lines should be:
- toolMap[square_mc] = Square;
- toolMap[circle_mc] = Circle;
- toolMap[triangle_mc] = Triangle;
What we're doing is associating a single button with the appropriate Class that defines the shape symbol. Notice we're not doing toolMap[square_mc] = new Square(); instead, we're just storing a reference to Square itself, not an actual instance of a Square. We're getting into some advanced thinking here, but bear with me.
Next, our onCanvasClick function needs to have the switch block surgically removed and replaced with code that will look up our predetermined value from the map. Delete from the word "switch" to the closing curly brace after the default. Then modify the first line to look like this:
- if (!toolMap[currentTool]) return;
- var shape:MovieClip = new toolMap[currentTool]();
And that's it! Run it; it should work exactly the same as before!
Whoah, what just happened? Is that what you'd call science? Or is that magic?
Let's evaluate these lines the way the Flash Player would, only a little slower. First, let's look at what happens when we evaluate toolMap[currentTool], as part of evaluating a Boolean expression into the if statement's condition. We have the currentTool variable. We need to know what value this is before going further. Let's say we've clicked on the circle button, so the value is circle_mc.
So we now look up toolMap[circle_mc] and we previously used the name of the circle's class for linkage, Circle. At this point, we acknowledge that this is a value. Then the NOT operator applies. Without the NOT operator, using Circle as a Boolean condition would be true, because it is a value and not null. But the NOT reverses it. So the condition is actually false. Therefore, we skip the rest of the line (the body of the if statement) and move on.
But if for some reason we got an invalid value out of the lookup table — for instance, when we first run the movie and there is no value in currentTool — that NOT null would evaluate to true and we'd run the line. This would spell the end of this function, as we simply return. Again, we're just covering the bases and preparing for the exceptions to the rule. The line is the equivalent of our final else and default in the previous iterations. However, it needs to be before the variable setting line, because if there isn't a valid value coming out of the lookup table, then that line would cause errors and fail.
So, when we get to the next line and we go through the same steps to retrieve the value out of the lookup table using our key. Assuming currentTool is circle_mc, the line could be rewritten as:
- var shape:MovieClip = new Circle();
Then we move on with the rest of the code as before, with the shape variable populated with one of the three shape MovieClips.
Crazy, huh? It's OK if that doesn't quite register, but I wanted to show you how simple it is to make decisions ahead of time and avoid big if/elses or switches.
Incidentally, I know I decried the use of the brace-less if statement, but in this simple case, I make an exception. Feel free to put braces around the return and make it a three-line statement, if you want.
I also find it ironic that in my attempt to avoid ifs and switches, I ended up having to use an if anyway. But it's a very simple if and doesn't really change the elegance of using a Dictionary.
Step 25: Conclusion
OK, this drawing app isn't going to replace Adobe Illustrator™ anytime soon, but it does give some insight to how an application that is tool-based, or context-based, would use one of several methods to change the details, or even the entire behavior, of the same action. The finished Flash file may be found in this tutorial's download.
Branching logic is an integral part to all programming. Without the ability to make decisions, your program will only ever do one thing. In order to do intelligent things, you need to master the branches. We did not touch on the ternary operator, also known as the if expression, which is often thought of as a short hand if/else and is extremely useful for setting a variable to one value or another, depending on a Boolean expression. If your brain isn't full enough yet, visit Wikipedia for their article on ?: (yes, that's what it's called). The syntax is basically the same as "C Variants." Or search Google for "ternary operator actionscript"
One final closing thought; in the intriguing book Beautiful Code, published by O'Reilly, available on Amazon, there is a chapter by Laura Wingred and Christopher Seiwald, who talk about writing a software package and running an analysis on it that compared the number of reported bugs with the number of times the code got indented another tab. Interestingly, the more times the programmers nested another, say, if statement and subsequently indented the code further, the more bugs there were. In the next major release of the software, the programmers made a directed effort to reduce the amount of heavily indented code and amazingly enough, the number of bugs went down. I offer this as a caution of going overboard with conditions. While a certain amount of logic is necessary, writing heavily nested branches is often confusing. It is actually for this reason that I encourage the use of lookup tables when possible as an alternative to the traditional if or switch statement.
If you've made it this far, congratulations! You've just completed a trifecta of lengthy discourses on programming fundamentals as they apply to ActionScript 3. The next step in this series will talk about Arrays and loops. After that, we can start to explore some further topics, like Object-Oriented Programming and things like the display list and XML. Thanks for reading!
source from: flash tuts+

0 nhận xét:
Post a Comment