Showing posts with label 3dmax. Show all posts

Wednesday, 9 September 2009

Engraved Logo Animation With Laser And Fire Sparks

In this tutorial, I will enhance Engraved Logo Animation tutorial with some laser beam dan fire sparks. I will use Particle Flow to create fire sparks, and then apply Video Post to create glowing laser effects. If you don't familiar with Particle Flow, an advanced particle system in 3ds max, I suggest that you read Getting Started With Particle Flow tutorial first.

This is what you are going to create:

1. First, you need the finished file from Engraved Logo Animation tutorial. You can download here (ZIP). Load file "engravedlogo_anim_finish.max".

In Front viewport create a cylinder. This is your laser. Use Radius=1.5, Height=400 and Height Segments=1. Position this cylinder at the beginning of animation (lower right of logo).

2. We are going to move cylinder to match the logo animation. Make sure cylinder is selected. Go to Motion tab. In Assign Controller rollout, highlight Position row, then click small button above. In opened dialog box, select Path Constraint. This feature will enable you to make cylinder moving along a path.

In Path Parameters rollout, click Add Path button, and press H in keyboard and choose Line01.

Turn on Auto Key. Then enter % Along Path value until cylinder motion is match with logo animation. You will create a lot of keyframes here. For example, create keyframes every 10-20 frames. If there's keyframes in frame 0 or 300, delete them, because you don't need this keyframes.

When finished, turn off Auto Key.

3. I want to make the laser only appear from frame 20 to 280. Select cylinder. Turn on Auto Key. Move slider to frame 0. Right click cylinder and choose Properties. In opened window, decrease Visibility=0.

Then right click cylinder and choose Curve Editor. In Track View-Curve Editor window, find Visibility in left pane. In right pane, you'll see a keyframe and a graph.

Use Add Keys button to click at graph three times. You'll have total 4 keyframes, next change keyframe position and value using bottom input box. Create a graph like image below.

In Part 1 tutorial, you have created laser using simple cylinder and animate this laser along a path. Next, you will create fire sparks using Particle Flow. If you don't know about Particle Flow, there's a beginner tutorial: Getting Started With Particle Flow

1. In Command Panel, choose Create>Geometry. Choose Particle Sysetms from drop down list. Click PF Source button, Click and drag in Front viewport to create a PF Flow icon. Use Logo size=2.5, Icon Type=Circle, Diameter=6, and use Quantity Multiplier in Viewport and Render=100%. Position this PF Flow icon exactly at the tip of cylinder.

Next, activate Select and Link tool. Link PF Flow icon to cylinder (select and drag from icon to cylinder). Now, PF icon is always attached to the cylinder.

2. Next step, modifying particle properties to create fire sparks. Open Particle View window (press 6). Highlight Birth 01 operator, use Emit Start=20, Emit Stop=280, and Amount=500. This means 500 particles will be emitted from frame 20 to 280.

Select Speed 01 operator. Use Speed=100 with variation=50%. Activate Reverse and set Divergence=60. Scrub slider or play the animation to watch the particle emits.

3. Next, select Shape Facing operator from Depot (bottom of Particle View window), hold and drag to replace the Shape 01 operator inside Event 01.

Use Size=10 with Variation=50%, W/H Ratio=20. This W/H ratio will create tiny long rectangle. shape for each particle.

To enable you view the particle in viewport, select Display 01 operator, and change display type=Geometry.

4. All fire sparks should fall to the ground. Let's add some Gravity. Create>Space Warps. Choose Forces from drop down list. Click Gravity button. Click and drag to create Gravity in Top viewport. Use Strength=0.1

5. To make the gravity into effect. Open Particle View window. Add Force operator from Depot into Event 01.In Force 01 parameters, Click Add button and click Gravity icon in viewport

Next, rotation. Select Rotation 01 operator, and use Orientation Matrix=Speed Space Follow.

Scrub slider or play animation, you'll have nice laser and fire sparks effect

by Didik Wijaya

Engraved Logo Animation With Laser And Fire Sparks In Part 1 tutorial, you have created laser. Then in Part 2 tutorial you created fire sparks effects using Particle Flow. The final touch: adding light, material and glowing effects to laser and fire sparks effects.

1. When laser hit the surface, fire sparks emits and the surrounding areas should a little bit lit up. So, create an omni light. Position this light closer to the surface (logo). You can use any color you want. Here I use combination of red and yelow color.

Using Select And Link tool, link this light to cylinder.

Next, we need to make light only lit from frame 20 to 280. Select light. Turn on Auto Key. Move slider to frame 0. Decrease Multiplier=0. Then right click light and choose Curve Editor. In Track View-Curve Editor window, find Multiplier in left pane. In right pane, you'll see a keyframe and a graph.

Use Add Keys button to click at graph three times. You'll have total 4 keyframes, next change keyframe position and value using bottom input box. Create a graph like image below.

2. Let's add material to the scene. Open Material Editor. Create two similar material with different color. One for laser (red) and the other for fire sparks (yellow).

Here's the material settings, 2 Sided, Self Illumination is active and change the color in Self-Illumination. And the most important thing, set Material Effects ID=1. Rename the material.

Apply laser material to cylinder at the scene (click and drag laser material to cylinder).

3. To apply fire sparks material to particle, open Particle View window. Add Material Static operator from Depot into Event 01. In Material Static parameters, click button under Assign Material. In openend window, select Browse From: Mtl Editor, choose "spark" material.

4. Next is adding glowing edges, From top menu choose Rendering>Video Post. In Video Post window, click Add Scene Event button. Choose Camera viewport.

The, click Add Filter Event button. Select Lens Effect Glow from drop down list. Click OK.

Finally, click Image Output Event button. Click Files button. Save your video later to any name you want dan format you want.

5. In Video Post window, double click Lens Effect Glow to setup some properties. To enable you viewing the scene, move slider to any frame, click Preview button, VP Queue and then Update button.

In Properties tab, uncheck Object ID and check Material Effects ID=1. From now on, all materials with Eddects ID=1 will have glowing effects.

Click Preferences tab. Use Size=2, and Intensity=50%.

6. Finally, render the scene. In Video Post, click Execute button (running man icon). Choose frame range and ressolution.

Download finished 3ds max lesson file

source from: escalight

Continue Reading...

Tire Tread Marks Animation

by Didik Wijaya

Tire Tread Marks AnimationYou may have tried Engraved Logo Animation Tutorial. Guess what? Techniques applied in that tutorial can be used in many cases. For example, like this tutorial, creating tire tread marks animation. In this tutorial you are not only learn to create tread marks, but also creating engraved tread marks effects when tire crossing sand or snow. Note: This tutorials is requested by Dave Van Dyke.

This is what you are going to create:

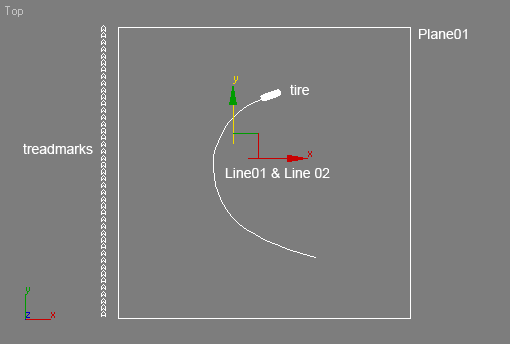
1. First download this file (ZIP). Open file "treadmarks_start.max". This file contains several objects. There are treadmarks objects, tire, two lines and a simple plane. Line01 and Line02 are basicaly the same line but with different height. I have animated the tire using Path Consttraint, based on Line02. Treadmarks object is just a series of spline applied with Extrude modifier. This treadmarks object has black color applied.

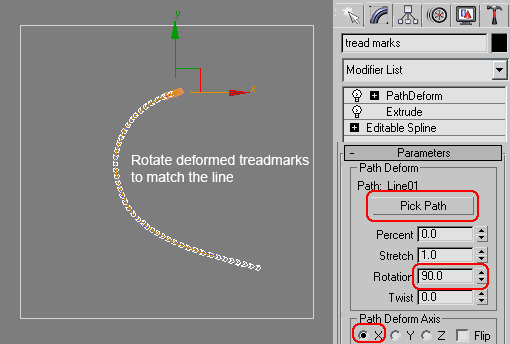
2. First step is deforming the treadmarks to match the path of tire animation. Select treadmarks object. Apply with Path Deform modifier. Click Pick Path button and click Line01 in viewport.

Use Rotation=90 and Axis=X. Then, you need to rotate deformed treadmarks object in many axis to match with the line.

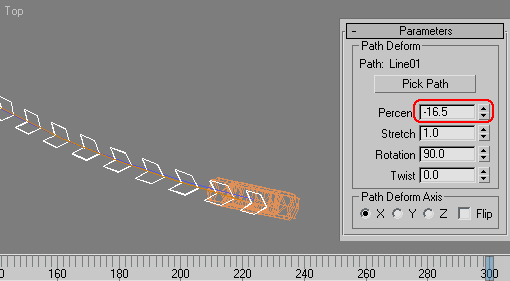
3. Move slider to frame 300 (end of animation). In Parameters roolout, change the Percent value until the tip of treadmarks object is at the middle of tire.

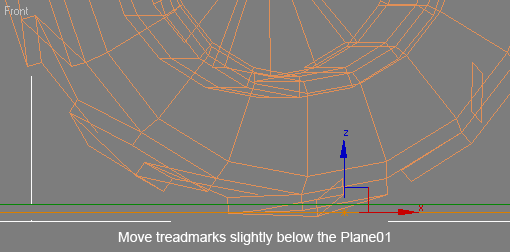
4. In Left viewport, move treadmarks object a little bit below the Plane01 (ground). What we need to do next is to move the treadmarks objects little by little up above the ground.

by Didik Wijaya

Tire Tread Marks AnimationIn Part 1 tutorial you have created a treadmarks along spline (tire animation path). Next, in this tutorial I will show you how to animate tread marks, making the tread marks slowly appear on the ground.

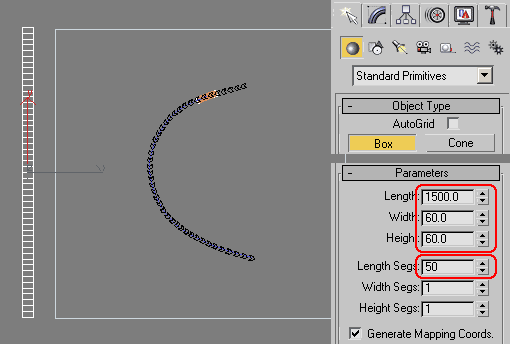
1. In Top viewport, create a box like image below. Use Length=1500, Width=60, Height=60. And Length Segs=50. Basically the box should have bigger size than tread marks.

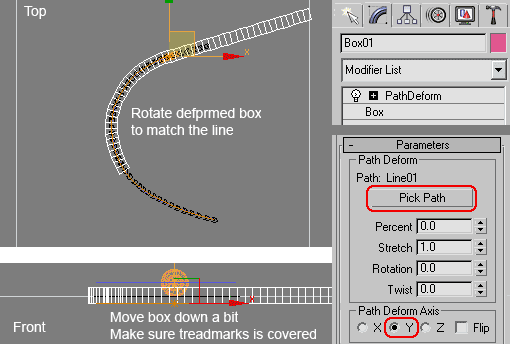
2. Select box, apply with Path Deform modifier. Use Line01 as path, Axis=Y. Rotate deformed box to match the line in top viewport. Finally, move box down a little bit. Make sure treadmarks object is covered by the box..

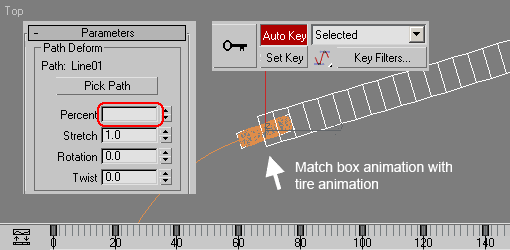
3. Select box. Adjust Percent value to match box animation with tire animation. The tip of the box should be always at the middle of tire (viewed from Top viewport). Move slider to frame 20. Activate Auto Key. Adjust Percent value every 20 frames. When finished, turn off Auto Key.

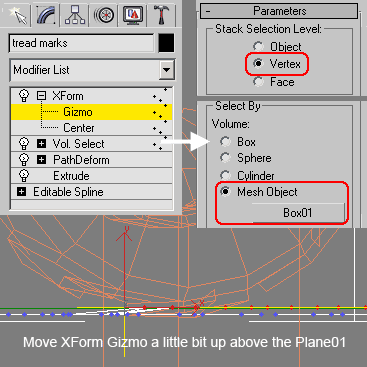
4. Select treadmarks object. Apply with Vol Select Modifier. In Parameters rollout, Activate Vertex. Select by=Mesh Object. Then click button under Mesh Object, and click box in viewport. Play animation, you should see vertices in treadmarks become selected when collided with box.

The next step is moving selected vertices above the plane (ground). Apply treadmarks object with XForm modifier. In Modifier Stack, click plus (+) sign and highlight Gizmo. In Front or Left viewport, move Gizmo (yellow cross) slightly above the Plane01. Now, selected vertices will be moved at the same height as the Gizmo.

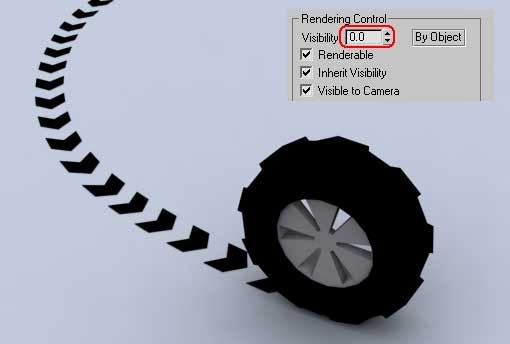
5. Don't forget to make the box invisibible. Right click box, choose Properties, and change Visibility=0.

Image below shows finished render up to this point. In some cases, this tutorial can be considered as finished. Tread marks using simple colored patterm like image below maybe enough for many situations.

But, the coolest part is in the next tutorial section. I will show you how to make engraved tire tread marks animation, when tire is rolling on the sand or snow..

by Didik Wijaya

Tire Tread Marks AnimationAfter creating simple tire tread marks animation in Part 1 and Part 2 tutorial, in this tutorial section I will show you how to create engraved tire tread marks animation. Unlike other tutorials which you use a lot of polygons to create engraved effect, in this tutorial you won't need much polygons here.

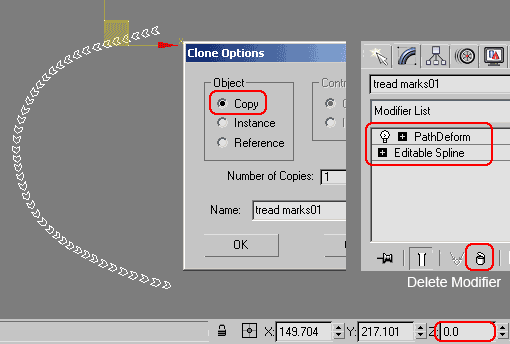
1. Continue with previous lesson file. Select treadmarks object. Move this object exactly at Z=0. (You can activate Select And Move tool, and enter Z=0 at the coordinate input box at the bottom of the screen).

Shift+click to create another duplicate. Use Clone Option=Copy. By default, duplicate object will be named as treadmarks01.

Select treadmarks01 object. Go to Modify tab. Delete several modifier in Modifier Stack, until you only have 2 rows: Editable Spline and Path Deform. Now, treadmarks01 is a deformed spline.

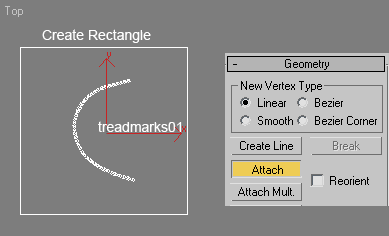
2. Create Rectangle as big as Plane01. Then delete the plane (Plane01). You don't need this object anymore.

Notice that you now have treadmarks01 and rectangle. Select Rectangle, right click and choose Convert to>Convert to Editable Spline. Go to Modify tab, in Geometry object, click Attach button, and click treadmarks01 object. Both objects are combined as one spline.

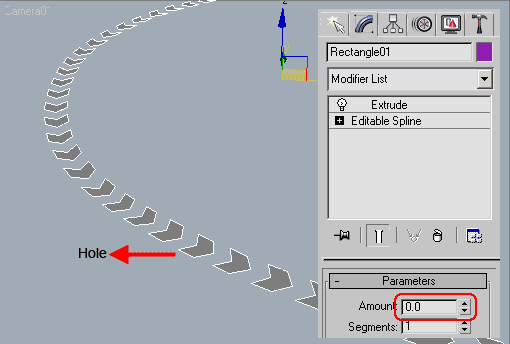
3. Apply combined spline with Extrude Modifier. Use Amount=0. Now, you have a plane with holes. Fortunately, we have treadmarks object. This object is used to fill the holes. Just apply the same material or color to both objects (plane with hole and treadmarks)

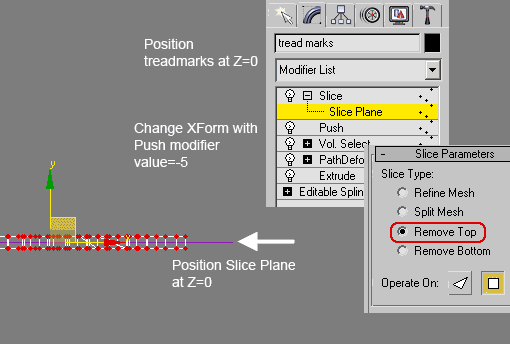
4. Select treadmarks object. In Modifier Stack, delete XForm modifier. Apply Push Modifier. Use Amount=-5. Push modifier will create an engraved looks, but the engraved effect is too high. We need to slice by half. Apply Slice modifier. In Modifier Stack highlight Slice Plane sub object. Position slice plane at Z=0. Then in Slice Parameters rollout, choose Remove Top.

5. This tutorial is finished. Video below shows sample of finished engraved tire tread marks animation..

source from: escalight

Continue Reading...

Write On Animation Using 3ds Max

by Didik Wijaya

Write On Animation Using 3ds MaxThis tutorial will show you how to create nice write on animation, where a pen will write calligraphic letter one by one. This tutorial is divided into 3 parts. In Part 1 tutorial, you will create basic write on animation. In Part 2, you will modify the animation, so that the letter looks like written with calligraphic styles (different strokes on each letter). Last, in Part 3, you will add pen animation.

1. First, download 3ds max file here. This file contains several objects: pen, ink bottle, paper, and the important one, a line.

2. You create a line by yourself or just using line provided with 3ds max file. If you want to create by yourself, create Line with Initial Type=Smooth and Drag Type=Bezier/Smooth.

3. Let's begin. In Top viewport, create a Plane with Length=1 and Width=300. Use Width Segments=500. This plane is used as letter, so higher Width Segments value will result in smoother letter.

Then apply Path Deform modifier to this plane.In Parameters rollout, click Pick Path button and click line in viewport. Use Path Deform Axis=X. Plane will be deformed to fit the line. But its orientation is not right.

4. Move and rotate plane in Top viewport. Put it at the middle of paper. Use line as guidance.

5. To create write on animate, we need to change parameters in Path Deform (Percent and Stretch). Activate Auto Key.

Move slider to frame 0. Use Percent=0 and Stretch=0.001

Move slider to frame 200. Use Percent=50 and Stretch=1.03.

When finished turn off Auto Key. Move slider to watch the animation.

In Part 1 tutorial you have created a basic letter write on animation. But, the letters have the same stroke width. It makes the animation looks dull and boring. In this tutorial you will modify the letter to create calligraphic looks.

1. Make sure Plane01 (letter) is selected. Go to Modify tab. In Modifier Stack highlight Plane row, and in Parameters rollout use Lenght=2. You'll have wider letter.

Then, in Modifier stack highlight Path Deform row. In Parameters rollout, use Rotation=76 and Twist=553.5. You'll have something like image below.

2. But, unfortunately the letter is now have height. Use Select And Uniform Scale Tool to scale the height of letter object along vertical axis. Scale down as thin as possible until you have a thin letter object (like a plane). You may need to move it up a little bit (position this object above paper).

3. Next, we need to give material to letter. Open Material Editor (press M in keyboard). Select one of unused material slot. In Shader Basic Parameters activate 2-Sided. And in Blinn Basic Parameters change Diffuse color to black. 2-Sided is used to give both sides of polygon the same material.

Make sure letter object is selected and press Assign Material to Selection button. Now, letter object is applied with black material.

In Part 1 tutorial you cerated a basic write on animation, then in Part 2 tutorial you modify the letter to get calligraphic looks. This time you will create pen animation. Creating pen animation is simple. You can easily create this kind of animation using Path Constraint animation

1. First, select pen object. We need to move its Pivot Point first. Go to Hierarchy tab. Click Affect Pivot Only button. In Top viewport move Pivot Point to the tip of pen. When finished turn off Affect Pivot only.

2. Make sure pen is still selected. Go to Motion tab. In Assign Controller rollout, highlight Position: Bezier Position. Then click Assign Controller button (small button above). In opened dialog box choose Path Constraint.

In Path Parameters rollout click Add Path button. Press H in keyboard and choose Line 01. Now, if you scrub slider, pen will move along a path (Line01).

3. Move slider back to frame 0. We need to modify pen orientation. Rotate to any direction you wish, just make sure pen is in position like writing on paper.

4. Srub slider to wath the animation. Notice that pen animation is not aligned with letter animation. To fix this, activate Auto Key. Move slider to frame where the animation is not match and in Path Options change % Along Path value until pen is aligned well with letter animation. Repeat this process several times on many frame position untill you have perfect animation. When finished turn off Auto Key and play your animation.

source from: escalight

Continue Reading...

Modeling Coca Cola PET Bottle

by Didik Wijaya

Modeling Coca Cola PET BottleIn this tutorial I will show you how to model a Coca Cola PET Bottle using 3ds max. For some people, creating this kind of bottle maybe just a piece of cake, but for 3ds max beginner user it may gives a lot of headache, especially creating the bottom part of the bottle. Here I will explain how to model Coca Cola PET Bottle using the most simplest and fastest technique.

1. First, download this file (ZIP). Open file "cola_bottle_start.max". This file contains a half a bottle spline. I assume you already know how to create a spline. Notice that in the bottom of bottle, I drew different spline profile.

2. Select spline, apply Lathe modifier. Activate Weld Core and Flip Normals. Use Segments=32. I will use Displace modifier later, so I need a lot of segments.

Use Direction=Y and Align=Min. 3D bottle is created.

3. Next, let's add some details. Convert bottle into Editable Poly. In Front viewport, select several vertical edges like image below (left side). After that, in Selection rollout, click Ring button. All vertical edges around the bottle will be selected.

Change to Top viewport, deselect several edges until you get something like image below (right side). I recommend to use Fence Selection Region Tool.

After that, in Edit Edges rollout, click Extrude Settings button. In opened window, use Extrude Amount=-1, and Width=3.

4. Let's move on to the bottom of bottle. In Perspective viewport, rotate view until you can see the bottom of bottle. Select edges like image below. Then in Edit Edges rollout, click Connect Settings button. In opened dialog box, use Segments=4. This procedure will add more polygons. This is useful when you want to create some details.

5. Change to Vertex selection. Select all vertices at the bottom of bottle (look at image below). Make sure these vertices still selected. Apply Displace modifier.

Click button under Bitmap, use file "cola_bottom.jpg". This file is available in when you downloaded file earlier. Use ALignment=Y and click Fit. Use Strength=52 and Decay=1.7. Notice what happened to selected vertices.

(file "cola_bottom.jpg")

6. Displace modifier pulls selected vertices based on image black and white information. Areas with white color will be pulled further than grey or black color. Left image below shows the result of Displace modifier.

Final task, convert bottle into Editable Poly and apply with Turbosmooth modifier. This tutorial is finished. Bottom right image shows rendered 3D Coca Cola PET Bottle.

Donwload 3dsmax lesson file (ZIP)

source from: escalight

Continue Reading...
 

Blogroll

Site Info

Text

Tut - Designer Copyright © 2009 WoodMag is Designed by Ipietoon for Free Blogger Template