by Didik Wijaya
 You may have tried Engraved Logo Animation Tutorial. Guess what? Techniques applied in that tutorial can be used in many cases. For example, like this tutorial, creating tire tread marks animation. In this tutorial you are not only learn to create tread marks, but also creating engraved tread marks effects when tire crossing sand or snow. Note: This tutorials is requested by Dave Van Dyke.
This is what you are going to create:
1. First download this file (ZIP). Open file "treadmarks_start.max". This file contains several objects. There are treadmarks objects, tire, two lines and a simple plane. Line01 and Line02 are basicaly the same line but with different height. I have animated the tire using Path Consttraint, based on Line02. Treadmarks object is just a series of spline applied with Extrude modifier. This treadmarks object has black color applied.
2. First step is deforming the treadmarks to match the path of tire animation. Select treadmarks object. Apply with Path Deform modifier. Click Pick Path button and click Line01 in viewport.
Use Rotation=90 and Axis=X. Then, you need to rotate deformed treadmarks object in many axis to match with the line.
3. Move slider to frame 300 (end of animation). In Parameters roolout, change the Percent value until the tip of treadmarks object is at the middle of tire.
4. In Left viewport, move treadmarks object a little bit below the Plane01 (ground). What we need to do next is to move the treadmarks objects little by little up above the ground.
by Didik Wijaya
In Part 1 tutorial you have created a treadmarks along spline (tire animation path). Next, in this tutorial I will show you how to animate tread marks, making the tread marks slowly appear on the ground.
1. In Top viewport, create a box like image below. Use Length=1500, Width=60, Height=60. And Length Segs=50. Basically the box should have bigger size than tread marks.

2. Select box, apply with Path Deform modifier. Use Line01 as path, Axis=Y. Rotate deformed box to match the line in top viewport. Finally, move box down a little bit. Make sure treadmarks object is covered by the box..

3. Select box. Adjust Percent value to match box animation with tire animation. The tip of the box should be always at the middle of tire (viewed from Top viewport). Move slider to frame 20. Activate Auto Key. Adjust Percent value every 20 frames. When finished, turn off Auto Key.
4. Select treadmarks object. Apply with Vol Select Modifier. In Parameters rollout, Activate Vertex. Select by=Mesh Object. Then click button under Mesh Object, and click box in viewport. Play animation, you should see vertices in treadmarks become selected when collided with box.
The next step is moving selected vertices above the plane (ground). Apply treadmarks object with XForm modifier. In Modifier Stack, click plus (+) sign and highlight Gizmo. In Front or Left viewport, move Gizmo (yellow cross) slightly above the Plane01. Now, selected vertices will be moved at the same height as the Gizmo.
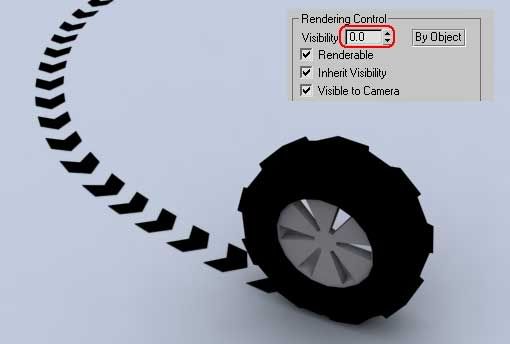
5. Don't forget to make the box invisibible. Right click box, choose Properties, and change Visibility=0.
Image below shows finished render up to this point. In some cases, this tutorial can be considered as finished. Tread marks using simple colored patterm like image below maybe enough for many situations.
But, the coolest part is in the next tutorial section. I will show you how to make engraved tire tread marks animation, when tire is rolling on the sand or snow..
by Didik Wijaya
After creating simple tire tread marks animation in Part 1 and Part 2 tutorial, in this tutorial section I will show you how to create engraved tire tread marks animation. Unlike other tutorials which you use a lot of polygons to create engraved effect, in this tutorial you won't need much polygons here.
1. Continue with previous lesson file. Select treadmarks object. Move this object exactly at Z=0. (You can activate Select And Move tool, and enter Z=0 at the coordinate input box at the bottom of the screen).
Shift+click to create another duplicate. Use Clone Option=Copy. By default, duplicate object will be named as treadmarks01.
Select treadmarks01 object. Go to Modify tab. Delete several modifier in Modifier Stack, until you only have 2 rows: Editable Spline and Path Deform. Now, treadmarks01 is a deformed spline.

2. Create Rectangle as big as Plane01. Then delete the plane (Plane01). You don't need this object anymore.
Notice that you now have treadmarks01 and rectangle. Select Rectangle, right click and choose Convert to>Convert to Editable Spline. Go to Modify tab, in Geometry object, click Attach button, and click treadmarks01 object. Both objects are combined as one spline.
3. Apply combined spline with Extrude Modifier. Use Amount=0. Now, you have a plane with holes. Fortunately, we have treadmarks object. This object is used to fill the holes. Just apply the same material or color to both objects (plane with hole and treadmarks)
4. Select treadmarks object. In Modifier Stack, delete XForm modifier. Apply Push Modifier. Use Amount=-5. Push modifier will create an engraved looks, but the engraved effect is too high. We need to slice by half. Apply Slice modifier. In Modifier Stack highlight Slice Plane sub object. Position slice plane at Z=0. Then in Slice Parameters rollout, choose Remove Top.
5. This tutorial is finished. Video below shows sample of finished engraved tire tread marks animation..
source from: escalight

0 nhận xét:
Post a Comment