Download Source File
Step 1: Create a new document in Illustrator.
Step2: In the tools panel select Rounded Rectangle Tool.

Step 3: Now draw a rounded rectangle on the screen.
Step 4: Select Fill color as white and remove the Stroke color. You can remove the Stroke color by selecting Default Transparency on the Appearance Panel. Now change the Stroke weight to zero.

Step 5: Now left click the rounded rectangle. Click Effects on menu bar and select 3D and select Extrude & Bevel.

Step 6: Select Preview option.
Now change values in the text box,
Rotate on X-axis: 58
Rotate on Y-axis: -76
Rotate on Z-axis: 43
Set Extrude Depth as 346 pt
In Bevel select Complex 2
Select Height as 12 pt

Step 7: Now the rounded rectangle will appear like this,

Step 8: Similarly draw two circles, one circle slightly bigger than the other.
Select the bigger give it dark shade color and remove the stroke color.
Left click on the bigger circle, select Effects -> 3D -> Extrude & Bevel.
Set X-axis rotation: -171
Set Y-axis rotation: -68
Set Z-axis rotation: 1
Extrude Depth: 58 pt
Bevel: None
Step 9: Now select the smaller circle, give it a light color shade and remove the Stroke color.
Left click on the smaller circle, select Effects -> 3D -> Extrude & Bevel.
Set X-axis rotation: -171
Set Y-axis rotation: -68
Set Z-axis rotation: 1
Extrude Depth: 462 pt
Bevel: None
Now the two circles will look like this,

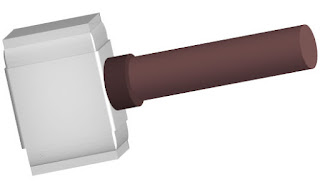
Step 10: Finally align all the pieces to make 3D hammer.
Copyright by : http://www.getw3help.com

0 nhận xét:
Post a Comment