Final Image Preview
Take a look at the image we'll be creating in this tutorial targeted at intermediate Photoshop users. Want access to the full PSD files and downloadable copies of every tutorial, including this one? Join Psd Plus for just $9/month. You can view the final image preview below or a larger version here.

Introduction
The images I've used are: The helmet , the cloud , the red star cloud , other star cloud image. Feel free to use your own images, however you may need to tweak the settings of any of the steps to get the right effect with different assets.
Video Tutorial
Our video editor Gavin Steele has created this video tutorial to compliment this text + image tutorial.
Step 1
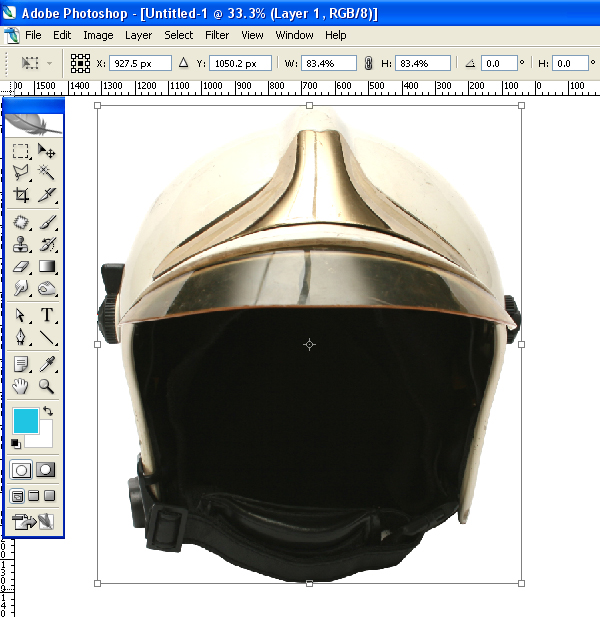
Create a new document 154.5mm by 216mm in size at 300dpi. Then open the Helmet image, cut it out using the Pen Tool (set to Paths not Shape Layers), and paste it into your blank document. Resize to about 83%.
Step 2
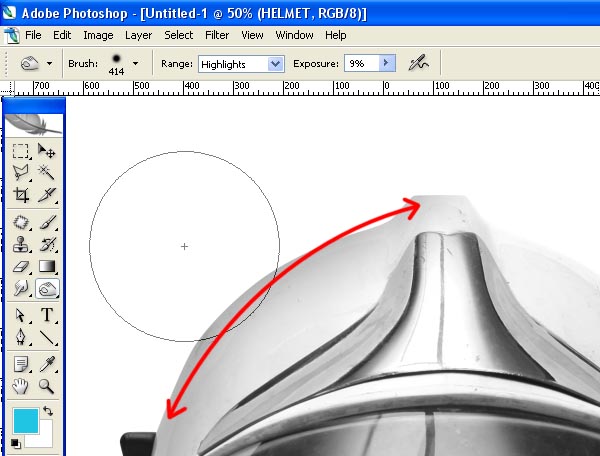
Go to Image > Adjustments > Desaturate to strip out the color. Then select the Burn Tool, set it to Highlights with an Exposure of around 10%. Use a big soft-edged brush to burn in a little shadow on the left of the "HELMET" layer.
Step 3
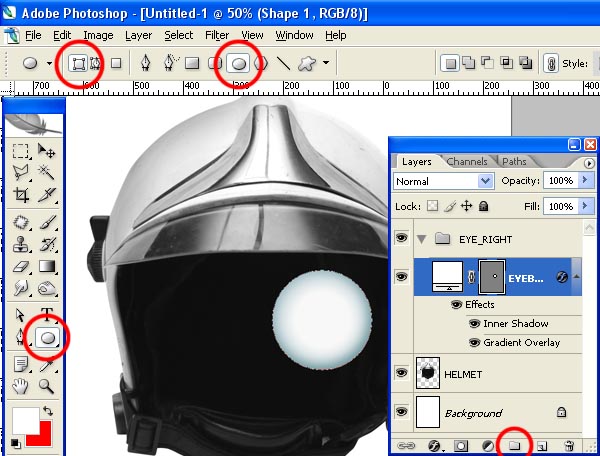
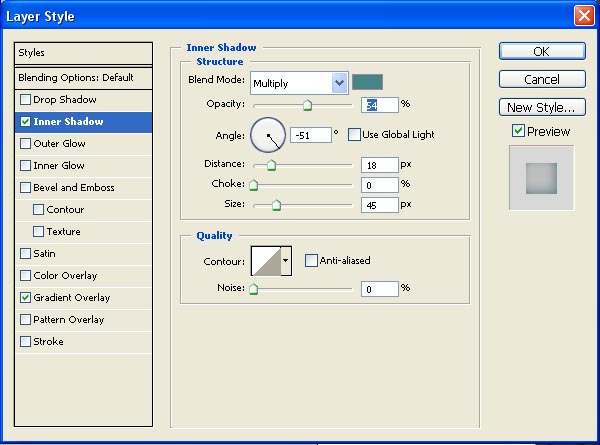
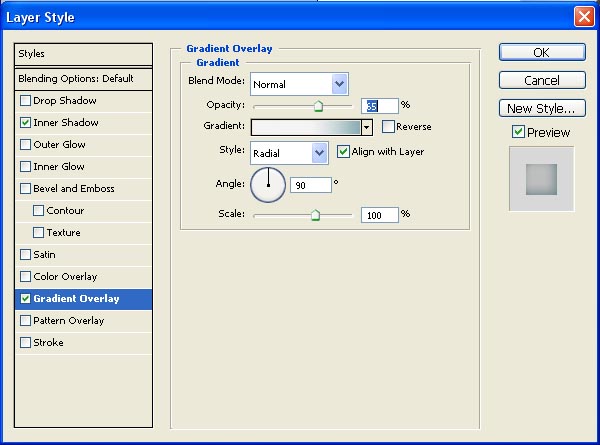
Use the Ellipse Tool to draw a circular Shape Layer, it has to be set to Shape Layers and not Paths, as indicated below. Hold the Shift key when drawing to make a perfect circle. Rename this layer "EYEBALL" and go to Layer > Layer Style > Inner Shadow and set it up as in the screen grab. Finally go to Layer > Layer Style > Gradient Overlay and set up as shown (the color is #8aabb3).
Step 4
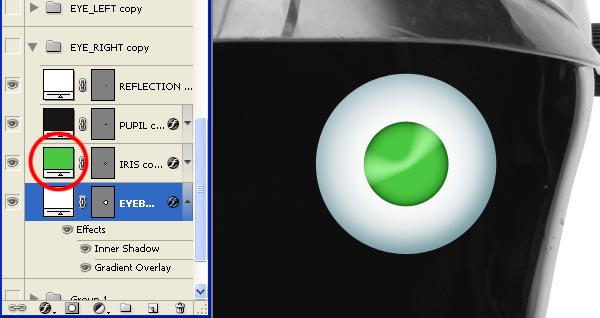
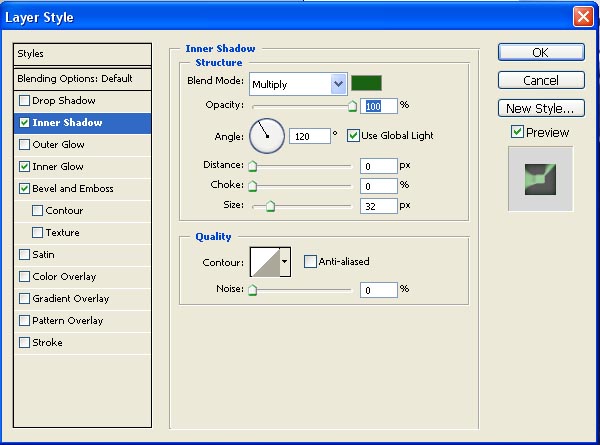
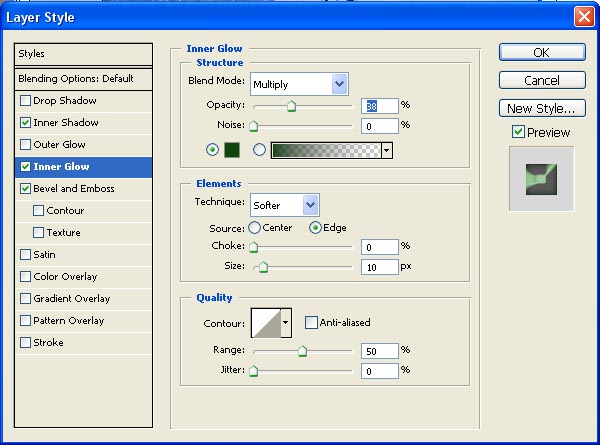
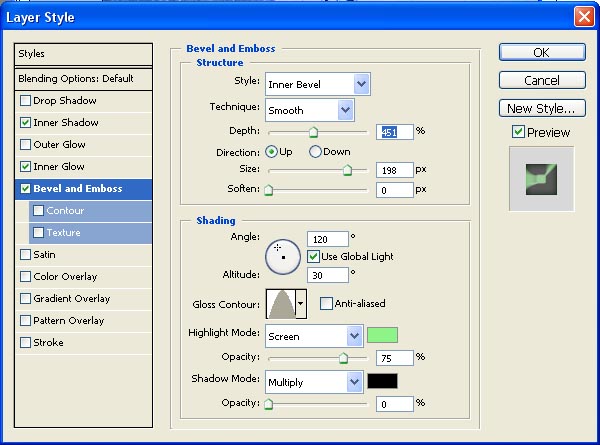
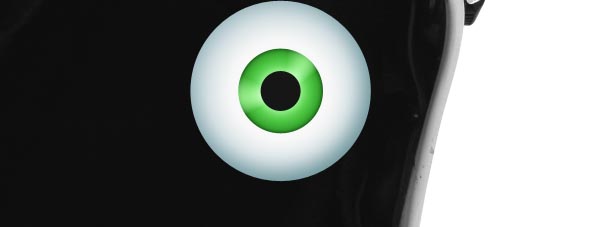
Draw another smaller circle above the Eyeball layer and call it "IRIS." Double-click on the "IRIS" layers color icon to change it. I've gone for a green but it doesn't matter. Add an Inner Shadow, Inner Glow and Bevel, and Emboss Layer Style as shown.
Step 5
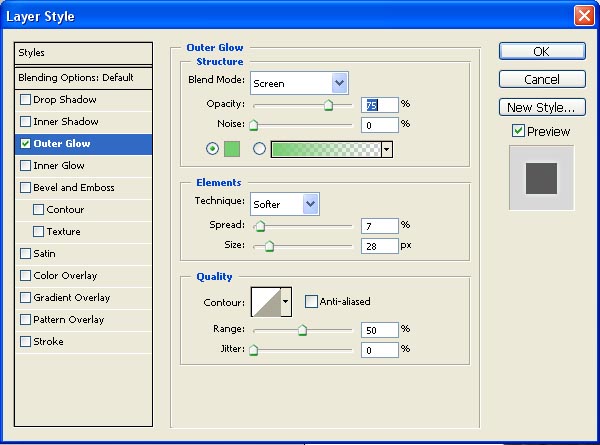
Draw a "PUPIL" in and give it an Outer Glow as shown below. When used creatively, Layer Style effects, or blending options, (however you want to refer to them) are a great way of adding depth to flat shapes.
Step 6
Finally add a small "REFLECTION" (small white circle) to the eye and move it to the right-hand-side of the "PUPIL." Select all of the eye layers and press Command + G to group them. Rename the group "EYE_RIGHT" and then duplicate by going to Layer > Duplicate Group (the group has to be selected in layer palette when you do this). Now name the duplicate "EYE_LEFT" and position them both to look like eyes.

Step 7
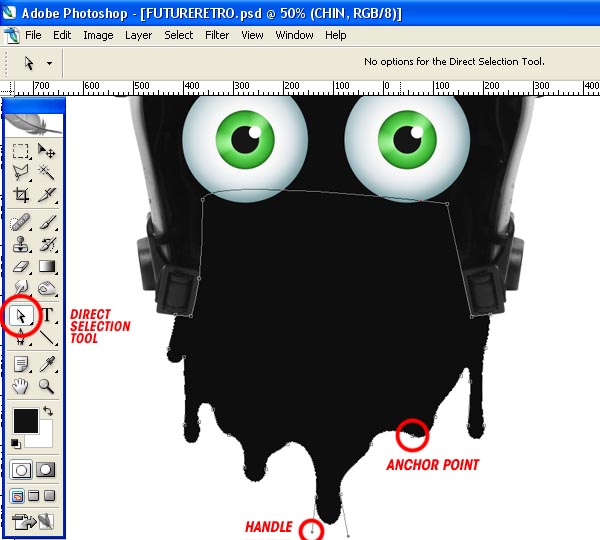
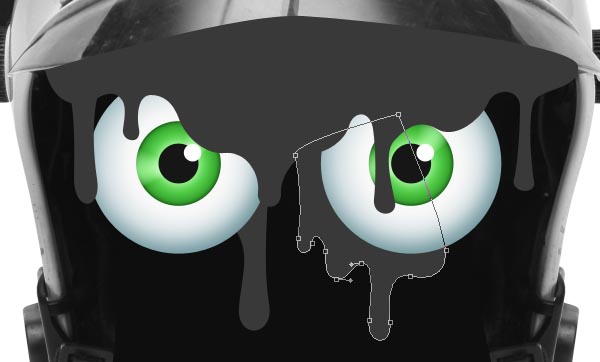
As drawing with the Pen Tool isn't the focus of this tutorial (and I've covered it before in the Splattered Vector and Photography Mash Up tutorial) I'm going to gloss over that quickly. Select the Pen Tool and set it to Shape Layers. Draw a rough drippy, beard-like shape over the base of the "HELMET." You can be a little rough with this. Use the Direct Selection Tool to clean up any curves you're not happy with by manipulating the Anchor Points and Bezier Curve Handles.
Step 8
Draw in some more goo as if it were coming from underneath the Helmet visor. Position it above the two "EYE" Layer Groups. Then draw in some smaller drips below the "EYE" Layer Groups.
Step 9
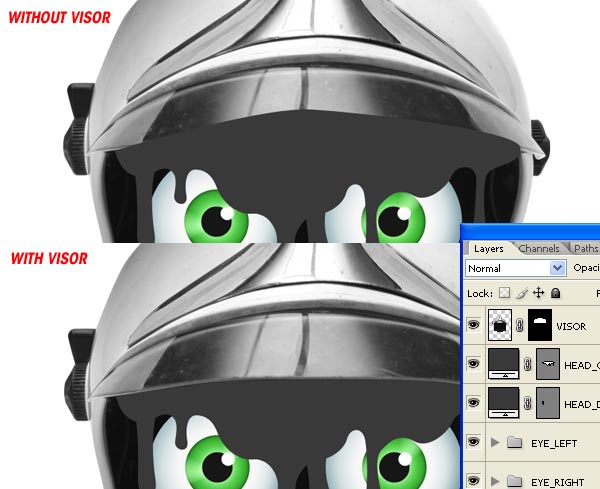
Duplicate the "HELMET" layer and drag it to the top of the Layers Palette. Select the Pen Tool and set it to Paths, then draw around the bottom of the visor and up to the top of the helmet. Then go to the Paths Palette and Command-click on your new path's thumbnail to make a selection from it. Then select the "HELMET copy" layer and go to Layer > Layer Mask > Reveal Selection.
Step 10
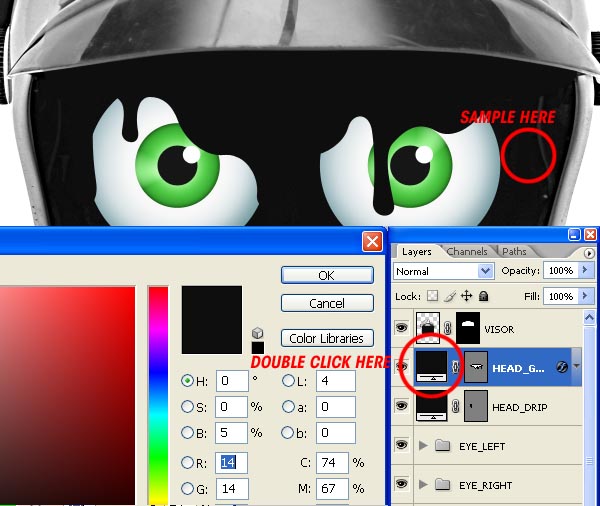
Now we want to change the color of all our Shape Layers to black. Double-click on the Shape Layer thumbnail to bring up the color window. Then sample a black from the Helmet and OK it. Repeat this for all the Shape Layers.
Step 11
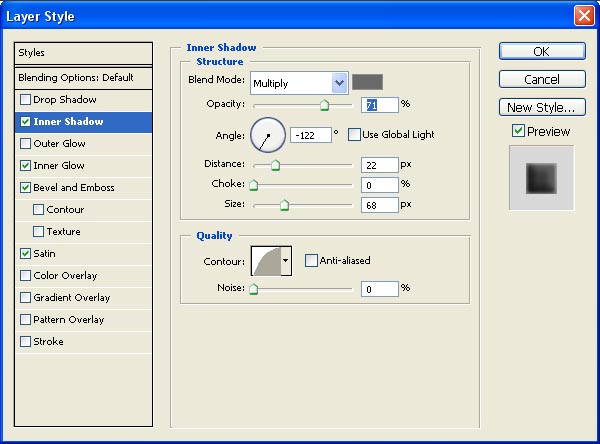
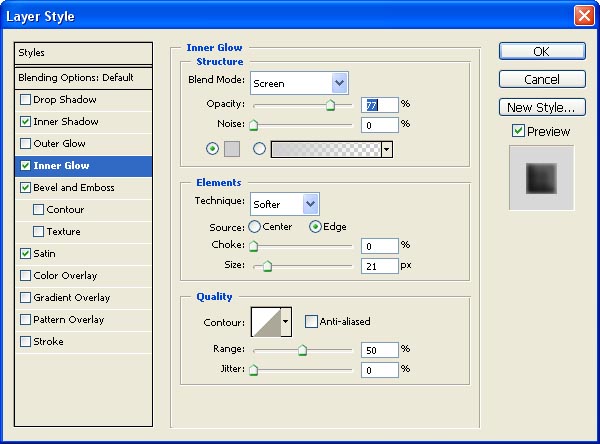
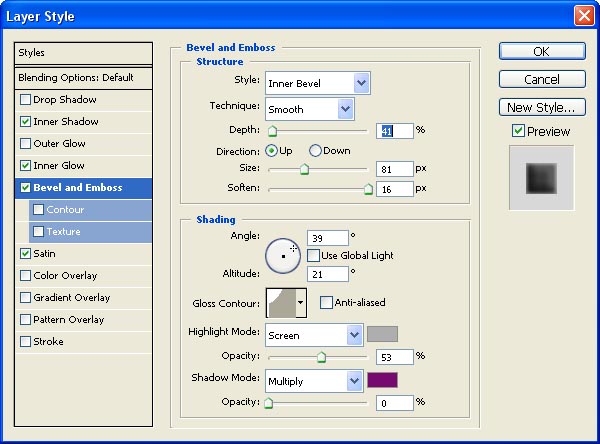
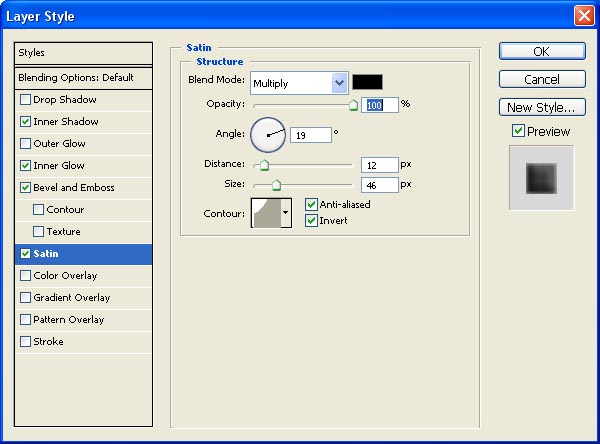
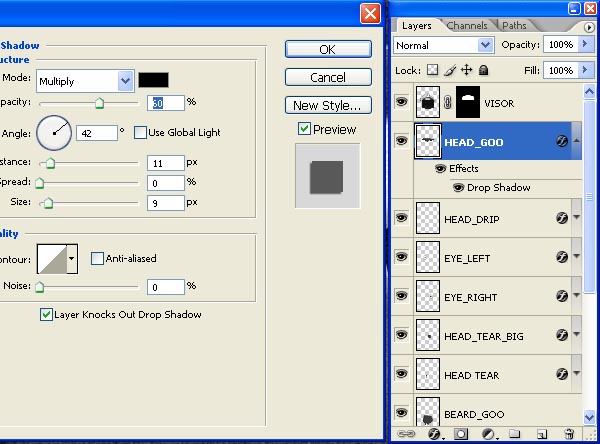
Select one of your shape layers. Go to Layer > Layer Style > Inner Shadow and input the settings shown below. Do the same for Inner Glow, Bevel and Emboss, and Satin. Go to Layer > Layer Style > Copy Layer Style and then select another shape layer and go to Layer > Layer Style > Copy Layer Style. Repeat this process until all of your shape layers are styled.
Step 12
Place a new blank layer under each shape layer. Now select one shape layer and it's blank counterpart. Then go to Layer > Merge Layers. This will rasterize the shape layer and it's effects. If anyone knows a better way of doing this in CS3 please post in the comments. I should really know this by now, but old habits die hard?
Step 13
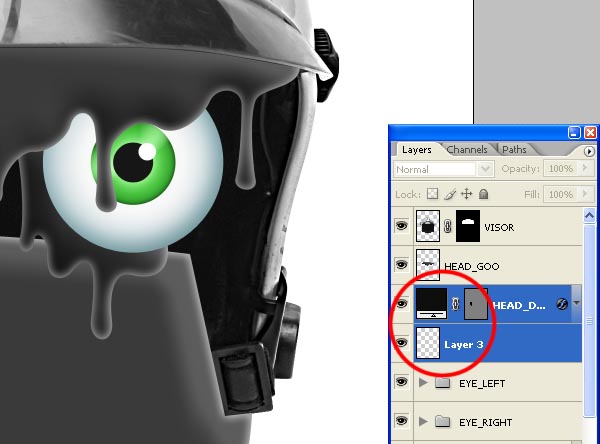
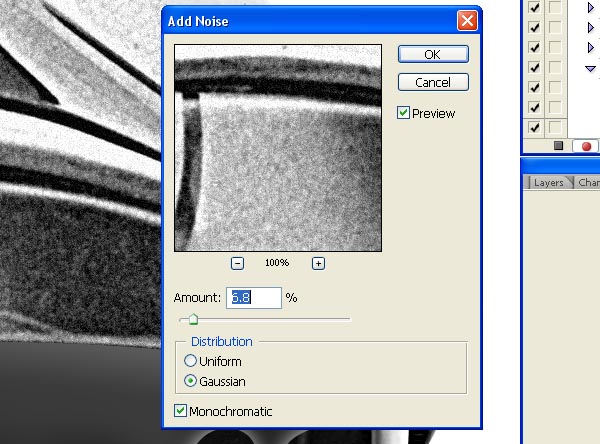
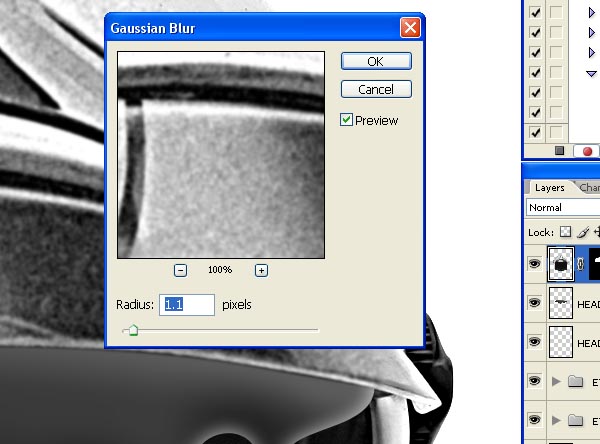
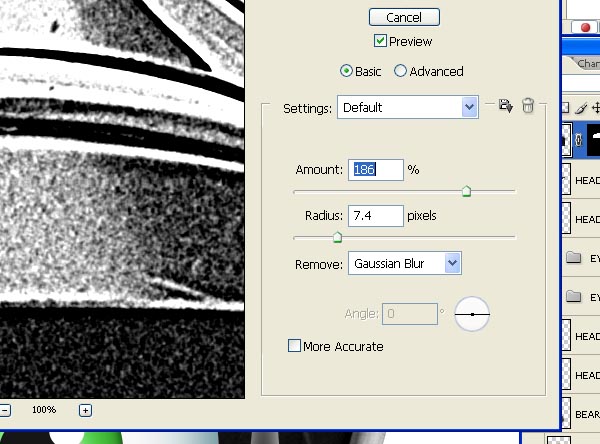
Select the "VISOR" layer (it should be the top layer in your palette) and open the Actions Palette. Call it "AGED PRINT" and assign it a function key. Then press the record icon at the bottom of the Actions palette and apply three filters in this order; Noise, Gaussian Blur, and Smart Sharpen. Refer to the images below for settings. Once done, press the stop button at the bottom of the actions palette. You can now use your assigned key to apply these filters to the other layers.

Step 14
Run the "AGED PRINT" action on all of your layers. Before doing the "EYE" group layers, merge them and desaturate them. At this stage your layers palette should look something like mine.

Step 15
Add a Layer Style (Drop Shadow) to each of your layers except the "VISOR," the "HELMET" and the "BEARD" layers. Rasterize all these layers as in Step 12.
Step 16
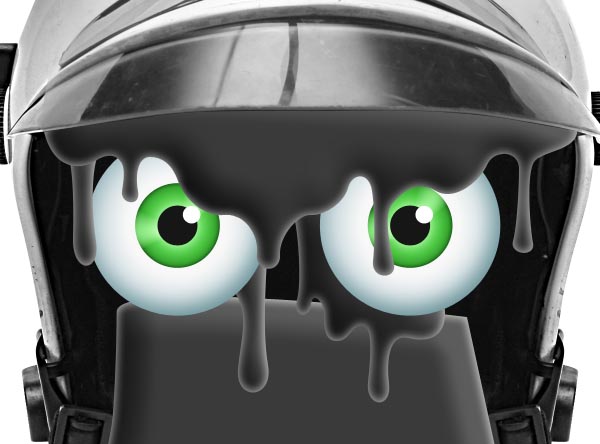
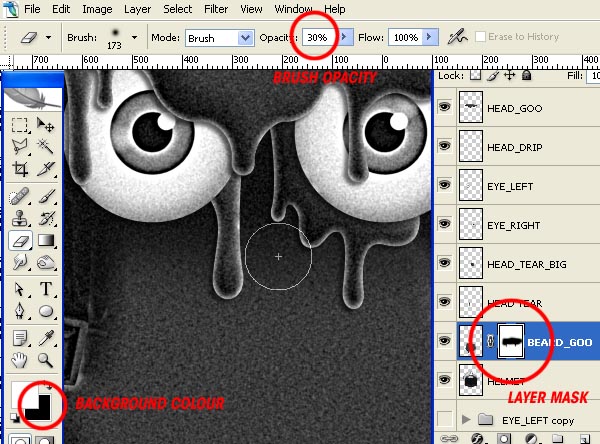
Select the "BEARD_GOO" layer and go to Layer > Add Layer Mask > Reveal All. Then select the Eraser Tool and set the background color to black. Take a soft edged-brush and set the brush Opacity to around 30%. Select the layer mask instead of the layer and chip away at the hard edges with the eraser until it blends in smoothly with the helmet. Change the brush size to suit and reduce the brushes Flow for a smoother transition.
Step 17
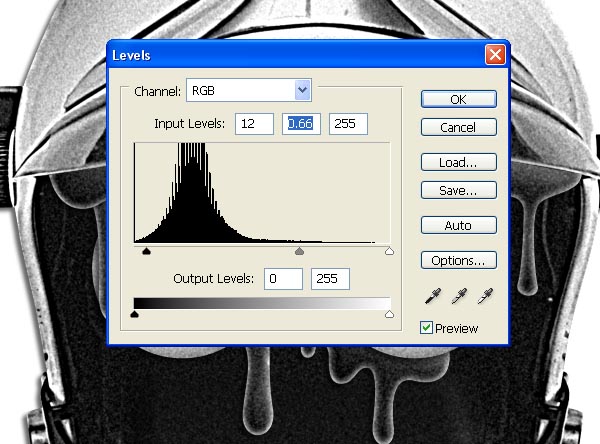
As the "BEARD_GOO" layer doesn't blend with the helmet fully, we need to adjust the Levels. Go to Image > Adjustments > Levels and tweak as shown.
Step 18
Open the cloud image or any cloud image that you want to use. Paste it into your working document, resize it, desaturate it and then run the "AGED PRINT" action.
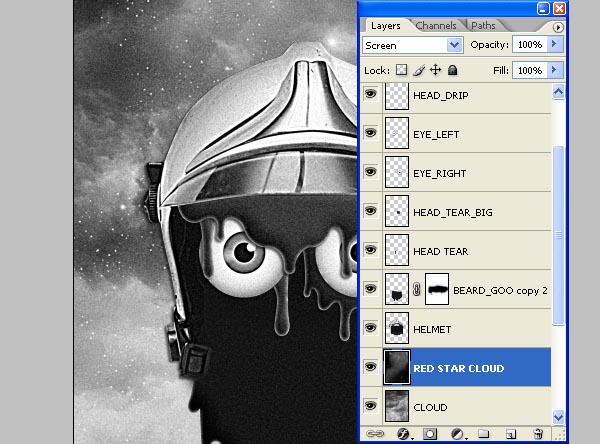
Step 19
Open the red star cloud image (or another suitable image) and paste it into your working document. Rotate it 90 degrees, resize it to fit, desaturate and then run the "AGED PRINT" action. Finally, set the Layer Blending Mode to Screen.
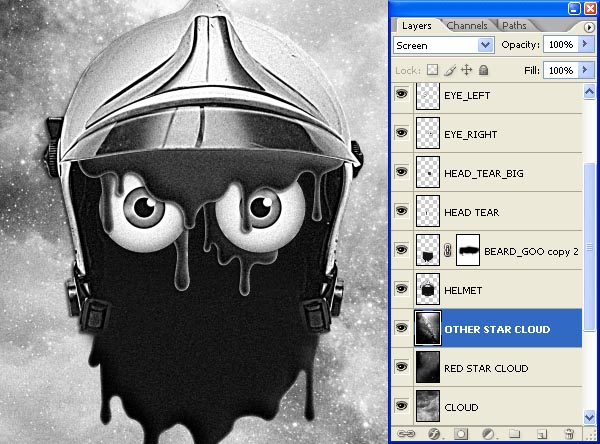
Step 20
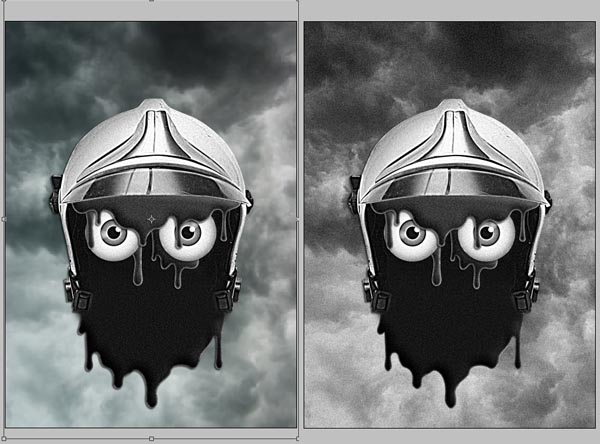
Open the other star cloud image and treat it in the same way. But rotate it -90 degrees instead of 90. Parts of this layer were too light for my tastes so I adjusted the Levels. Enter 62, 1.00 and 255 into the input values. If your layers palette is a bit of a mess like mine, you might want to group all the layers that make up the face and call the group "FACE."
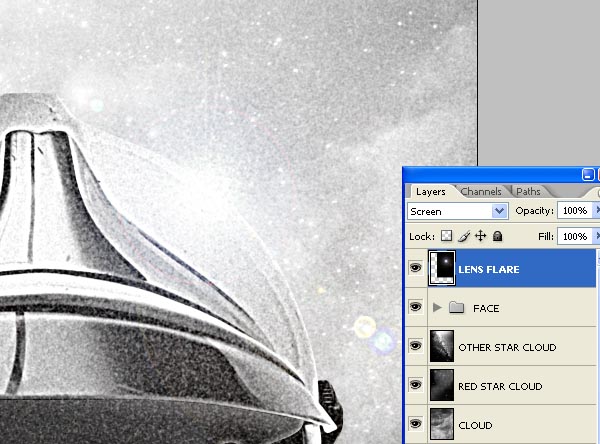
Step 21
Create a new layer at the top of the layers palette and fill it with black. Go to Filter > Render > Lens Flare and select 105mm prime. You can adjust the setting but I left mine as is, though I did move it down and right a little. Then run the "AGED PRINT" action twice and change the Layer Blending mode to Screen. Finally, adjust the Levels (29, 1.00, 255).
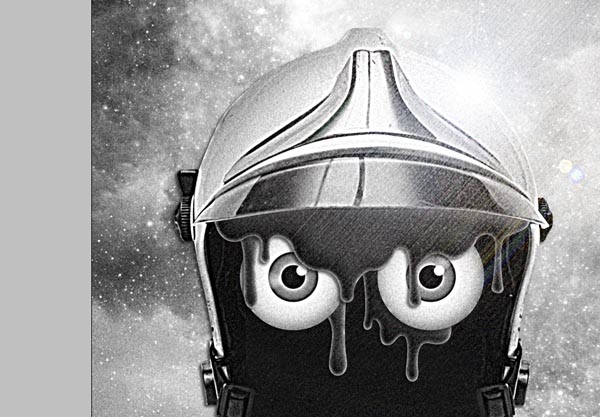
Step 22
Duplicate the "LENS FLARE" layer and call it "LENS FLARE STREAKS." Go to Filter > Blur > Motion blur and run a 999 distance blur at 48 degrees. Then go to Filter > Sharpen > Smart Sharpen and run a 25 pixel sharpen at 500%.
Step 23
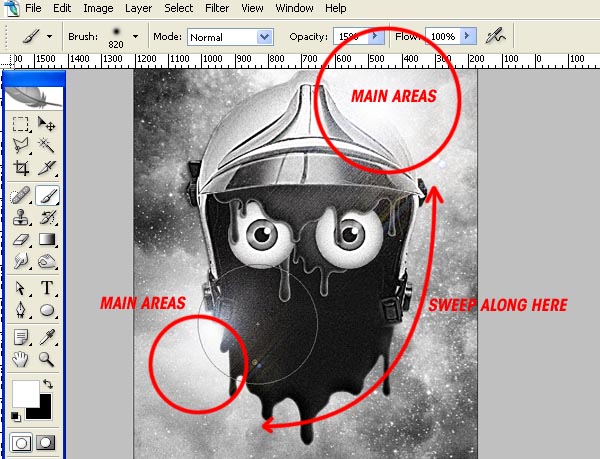
Create a new layer below the "FACE" layer group and call it "WHITE GLOW." Select the Paintbrush Tool and set it to 820 pixels, 0 Hardness with an Opacity of 15%. Add patches of glow behind the Lens Flares.
Step 24
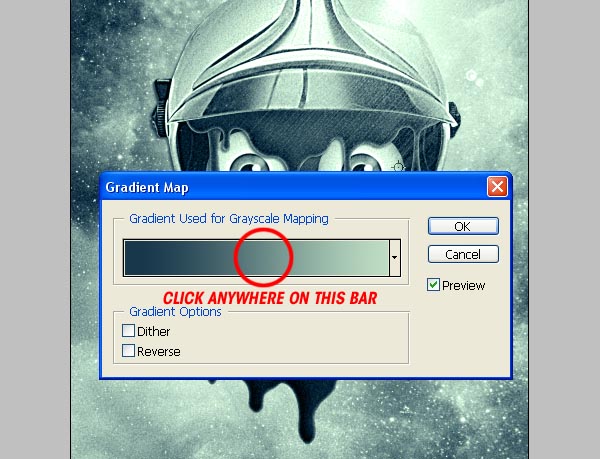
Create a Gradient Map Adjustment Layer at the top of the layers palette. Select the top layer (should be a "LENS FLARE" layer) and go to Layer > New Adjustment Layer > Gradient Map. In the window prompt rename it "GREEN/BLUE" and set the mode to Color.
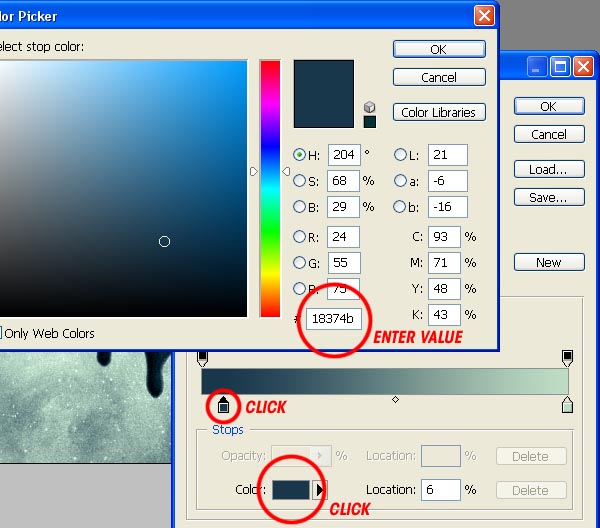
Click the colored bar to activate the color selection window and set the colors as follows: Left slider color #18374b, right slider #bedec4. Duplicate the Gradient Map Adjustment Layer and position the dupe below the original. Set the Layer Blending Mode to Screen and the Opacity to 70%.
Step 25
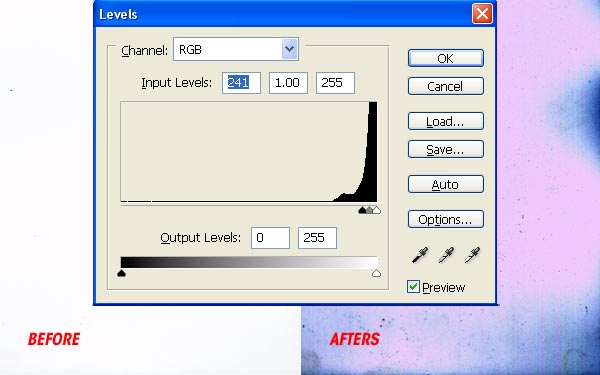
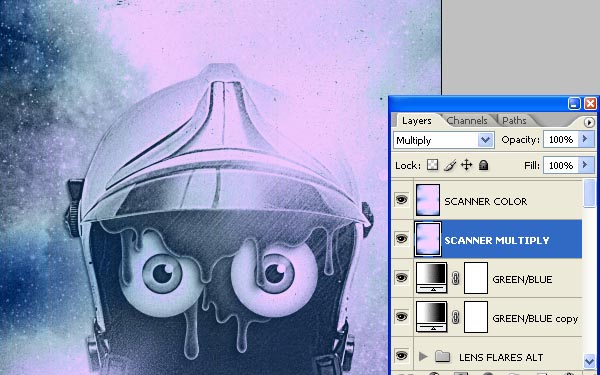
Now it's time to get creative with your scanner (if you don't have one open SCANNER.jpg here). Scan your scanner without putting anything on the bed, so it scans it's own lid. Open it up and boost the levels as shown below. Paste it into the working document and resize to fit. Set the Layer Blending Mode to Multiply, then duplicate this layer and set it to Color, with an Opacity of 40%.
Step 26
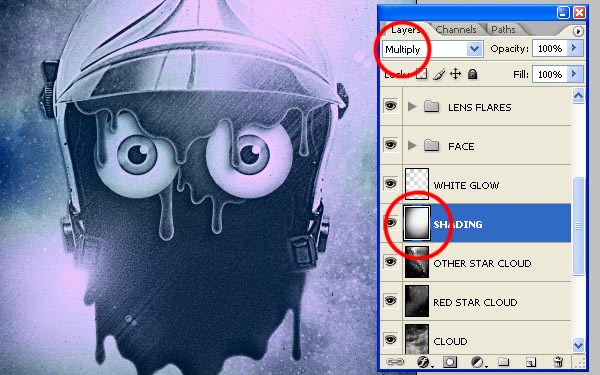
Add some shading to the background by creating a new layer and filling it with white. The layer should be positioned under the "FACE" group but above the clouds and star clouds, etc. Select the Burn Tool and use a 900 pixel, soft-edged brush. Set the exposure to 25% then begin burning around the top-left, bottom-left and bottom-right corners. Feather it in the middle so the edges are darker.
Step 27
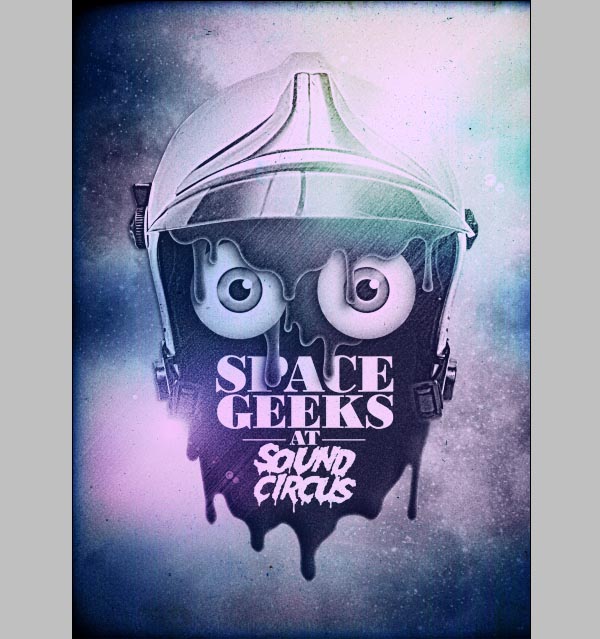
Now I resized the "FACE" group to improve the composition. Also, I added some text inside. While the text construction isn't covered in the tutorial, feel free to add your own creative text solution here.
Step 28
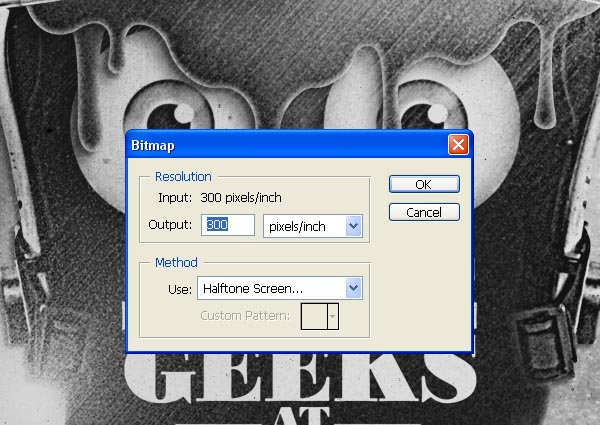
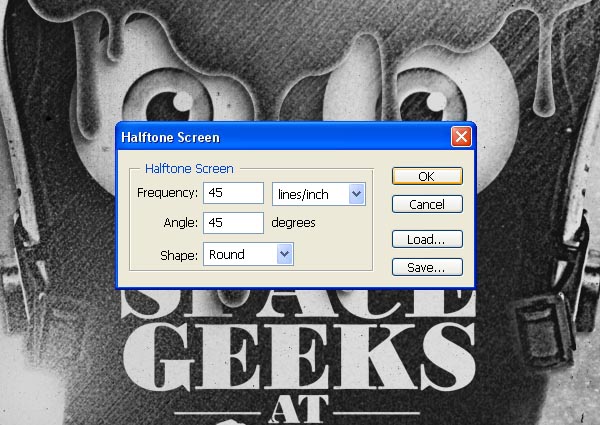
Finally, go to Mode > Grayscale and click Flatten when prompted. Then go to Mode > Bitmap and you"ll be prompted with another window. Follow the screen grabs below and OK it. Select the whole canvas and copy it. Open the History palette and return to before you went to Mode > Grayscale. Paste the Bitmapped image at the top of the layers palette.
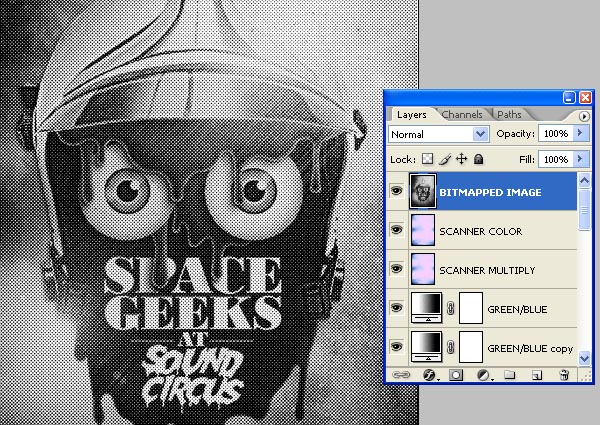
Step 29
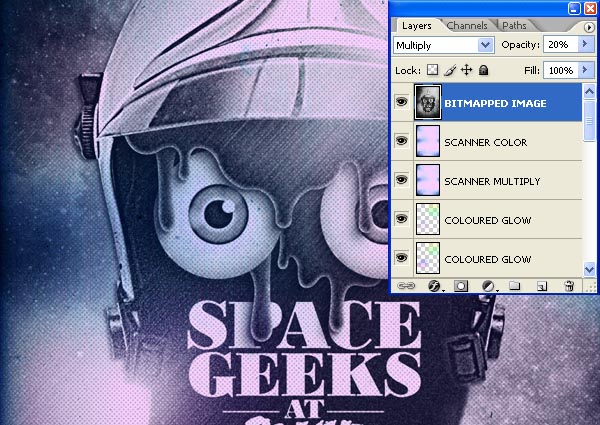
Finally, change the "BITMAPPED IMAGE" Layer Blending Mode to Multiply and reduce the Opacity to 20%.
Conclusion
You don't have to stop there though, I went on to add another "LENS FLARE" over the original "LENS FLARE" and some very slight colored glow over the "LENS FLARE" layers. The important thing is to follow the tutorial and understand what each step does, then tweak the settings to best suit your source imagery. You can view the final image below or a larger version here.
Copyright by : psd tuts+

0 nhận xét:
Post a Comment